Showing posts with label Y-Edge Stitch. Show all posts

Wednesday, 1 May 2024

WIPW - A Productive Week

It has been a productive week to show for Work In Progress Wednesday.

Sunday Stitch School Stitch Sampler

The following stitches were added:

#261 Y-Edge Stitch (pink thread on turquoise silk appliqué), #262 Star of David Stitch (pink), #263 Six-Pointed Star Stitch (purple), #279 Spinal Double Stitch (light blue and pink variegated and purple)


#283 Raised Lace Bullion Stitch (pale yellow and green)


Friday, 29 September 2023

Friday Revision Homework - Stitches: 261 - 265

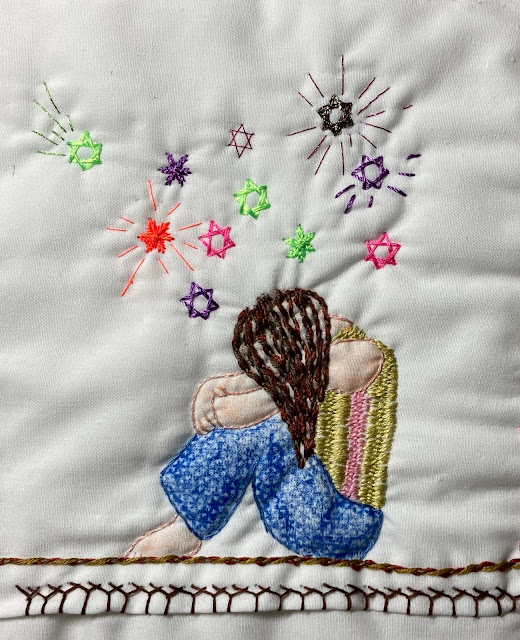
I want to feature Sunbonnet Sue at many stages of her life. 

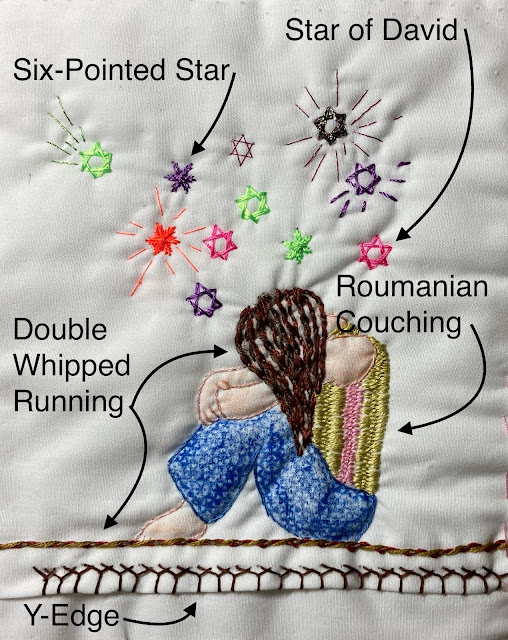
Here she is in her teens, brooding over life, love, school, music, God, the future, acne,  plastic marine pollution.... She is wondering whether to join the fencing team or embroidery club at school, to make do with her pocket money or get a part-time job after school, to continue to wait for Sam in the year above to call or to be brave enough to text him, to apply for an exchange student programme and go abroad for a year... or should she give in to the pressure from her friends and try that party drug, or join the volunteers and clean up the beach, or...

Poor Sue is thinking so hard she's got a splitting headache.

Did you have an identity crisis in your youth?


Apart from the stitches above, I have also used Stem Stitch and Straight Stitch.

Sunday, 24 September 2023

Sunday Stitch School - Revision: Stitches 261 - 265

Before Sunbonnet Sue decides what she will be up to this time, let's review the last five stitches. Click on the title for a link to the instructions.

261 Y-Edge Stitch

In looks it is very similar to #263 Plaited Fly Stitch or a line of Fly Stitch rubbing shoulders. However, when worked over a folded edge, you can see the difference.

Is Sue going to work it on an edge or not?


262 Star of David

This is one of the first stars I learned to draw as a child - two triangles on top of each other, one upside down. To stitch it, you 'draw' it in a totally different way.


263 Six-Pointed Star

See what happens when the stitcher can't stop with a Star of David but continues to work the needle and thread around the shape. Magic!

264 Roumanian Couching

You need only one thread. You make a long stitch and then couch it down on the way back. The coaching part of the stitch is rather wide, so you might not work out how the stitch is made at first glance. 

It covers the foundation fabric nicely. You need, however, a good supply of thread in your stash for this hungry stitch. Worked on Aida it looks very neat with tidy edges. In freeform style, it can get a bit shaggy if you are not careful, or if that is your wish.


265 Double Whipped Running Stitch

See how the humble Running Stitch (TAST #10) can dress itself up.


Homework:

This is the back of the homework, not a single stitch has been made yet to show you what Sue is doing.

Friday, 18 August 2023

Friday Homework for Lesson 261: Y-Edge Stitch

 It's easy and looks nice on an edge.

Sunday Stitch School Reference Chart
I had to add a piece of ribbon to work this stitch on an edge.


Aida Sampler

Y-Edge Stitch looks especially nice when worked in a variegated thread.


Mottled Wool Scribble Cloth


If you stitch on a flat surface instead of over an edge, the stitch looks almost like #236 Plaited Fly Stitch.

You can see the difference here. 


Sunday, 13 August 2023

Sunday Stitch School - Lesson 261: Y-Edge Stitch

I found a nice edging stitch on Pinterest but unfortunately lost the source. I have searched but have not managed to locate the stitch again nor find its name. 

For the sake of simplicity, I will therefore call it Y-Edge Stitch until someone is kind enough to tell me what the official name is. If you know, please leave a comment below.

It is stitched on the edge and resembles the Half Herringbone Stitch (#258) in the way it is executed, but the look is (on the front) exactly like Plaited Fly Stitch (#236).


Work it like this:

Make a fold in the fabric.


Make a knot and take the needle out through the top.


It will look like this on the back.


Make an upright stitch from the back to the front through the fold.


Take a horizontal stitch in the top fabric only.


You'll see this on the back.


Repeat with an upright stitch through the fold.


Remember, the next horizontal stitch bites the front fabric only.


These stitches are wide apart and rather tall.


These are crammed closer together and are shorter.


If YOU were to name this stitch what would you use? Crowned Arch Stitch? Spiked Knuckleduster Stitch? I'll stick to Y-Edge Stitch for the time being.

Homework:
Add to the samplers.