Phew! I finished my homework with less than half an hour to spare - soon it will be Saturday here in Japan.
On the internet, I found an illustration which I thought would make a good Sunbonnet Sue.
Phew! I finished my homework with less than half an hour to spare - soon it will be Saturday here in Japan.
On the internet, I found an illustration which I thought would make a good Sunbonnet Sue.
Some of the five stitches we are going to review here are so simple, the only thing you need to know is how to make a Straight Stitch. Then add a bit of tweaking, and you have a variety of new stitches.
Click on the title to get to the stitch instructions.
The name says it all - two types of Xs, one large and one small, make up this stitch.
Isn't this a descriptive name?! You make it by placing two Straight Stitches leaning against each other.
The flames can also turn into grass or other things.
It was high time I added a Canvas Stitch. This is easy to make with two sizes of Straight Stitch.
This is a stitch that resembles an open hand-held fan. The more you open up the fan, the wider the stitch. Change the length of each Straight Stitch, and voila! new shapes take form.
Instead of Straight Stitch, this is based on Back Stitch/Split Stitch and looks a bit like a Chain Stitch.
Pueblo Stitch is best done slowly. Switching over the two coloured threads takes a bit of time before it becomes second nature. The result is a lovely braid.
Much has been written about the Pueblo Indians, their costumes and religious dances. Check out the Friday Homework page here.
My friend Janie left a comment about the Pueblo Indians and the origin of the name of the stitch.
I searched the web and found:
Janie also commented that she had heard Pueblo Stitch can also be called Split Ply Stitch. After some research, I found that there is a weaving technique with that name.
For an embroidery stitch, it also makes sense.
Look what my dictionary says about PLY:
[usually in combination] a strand of yarn or rope: [as modifier] : four-ply yarn.
• the number of multiple layers or strands of which something is made: the yarn can be any ply from two to eight.Do you remember #119 Alternating Magic Split Stitch and #120 Magic Split Stitch?
Instructions for Pueblo Stitch can be found in many places, on YouTube and at Sarah's Hand Embroidery Tutorials as well as at Arts&Design under Pueblo Stitch.
Q: So what differs between Alternating Magic Split Stitch and Pueblo Stitch?
A: The placement of the needle!
Compare the picture of Alternating Magic Split Stitch with the photo of Pueblo Stitch.
![]() |
In Alternating Magic Split Stitch, the tip of the needle comes out inside the previous 'Chain Stitch'. |
In Pueblo Stitch, the tip of the needle comes out in the hole just outside the 'Chain Stitch'. |
Here is my photo tutorial.
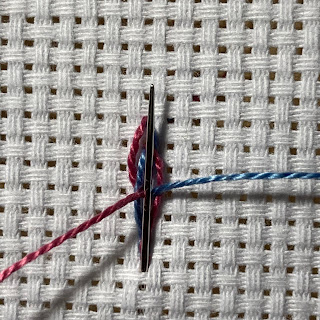
You need two threads of different colours on the needle.Take a Back Stitch by splitting the threads, red on the left and blue on the right.
Pull the threads through.
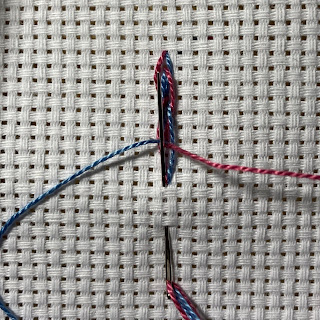
Take a Back Stitch and exit in the hole at the bottom of the 'Chain Stitch'.
Try to squeeze in a line of Pueblo Stitch on your samplers. The Mottled Wool Scribble Cloth is getting fuller and fuller. Is there any space left?