Showing posts with label Puncetto Valsesiano Stitch. Show all posts

Sunday, 7 May 2017

Sunday Stitch School - Revision: Stitches 16 - 20

We have done another set of five stitches so it is time for a revision of them here at Sunday Stitch School.

Following is a summery. Click on the headline to learn the stitch and read more.

16: Puncetto Valsesiano Stitch
Although this Italian stitch is mainly used for needle lace to decorate textile for the home or on folk costumes, I wanted to use it in embroidery.
It is simple and easy to learn, but attention must be paid on tension.

17: Q Stitch
An accidental stitch - many years ago I anchored a Lazy Daisy Stitch carelessly, and saw the letter Q staring back at me. Why not use it as a new stitch? I just had to introduce it on Sunday Stitch School.
It is simply a Detached Chain Stitch with the anchoring stitch askew.


18: Renaissance Stitch
Or should we call it Queen Stitch or Rococo Stitch or ....
This is an easy and enjoyable stitch which looks equally good as an individual stitch or when used for filling a larger area.


19: Satin Stitch Outline
Belonging to French Whitework, this stitch is great for making a solid thin line that stands up from the fabric.
Keeping the tension is the key, and I think the placement of the split in the Split Running Stitch is of importance, too, to avoid making such lumpy lines as you can see in the picture below.


20: Tete-de-boeuf Stitch
There are some questions about this stitch; how should it be worked and what should it be called.
One thing I know is that there is nothing 'beefy' about it. Instead it has a floral quality or could be used to illustrate cheering people or combined with another upside down stitch would maybe look like an ant...


Homework:
Use SSS stitches 16 - 20 on a Sunbonnet Sue design. This time let Sue go to Sweden. 
Change the thread to something more suitable for the Puncetto Valsesiano and Satin Stitch Outline, it you feel more comfortable with another type.
Try to complete it by next Friday. If not, you can have an extra week as the two stitches above are time consuming.


Friday, 31 March 2017

Friday Homework for Lesson 16: Puncetto Valsesiano Stitch

Teacher:   It's Friday, so hand in your homework!
Student:   Yes, Miss.
Teacher:   Hm, what's this then?
Student:   Hm, I don't know. It's supposed to be Puncetto Valsesiano Stitch.
Teacher:   Hm. Remind me, what was the set homework?
Student:   Pay attention to the tension, the twist and leave enough room in each knot to insert the needle on the return journey.
Stitch something high and lacy, 
and in the style of free form, 
and on plain cloth.
Teacher:   Well, have you paid attention to the tension and the twist?
Student:    Well, Miss, I have tried to. I certainly rolled the needle and sometimes let the needle and thread dangle to untwist itself, just as I was taught in the lesson.
Teacher:    Did you leave enough room in each knot to insert the needle?
Student:    Well, Miss. I tried to, and I hope you don't mind me saying this, but I think your instruction was wrong.
Teacher:    My instruction was WRONG???!!!
Students:  Yes, I am sure you meant 'leave enough room BETWEEN the knots'
Teacher:    Oh! So that is how you explain the unevenness of these stitches?
Student:    It WAS difficult to see where to insert the needle. It might also be due to poor lighting and my poor eyesight.
Teacher:   Hm, so in your opinion this stitch needs a good source of light and a magnifying glass.
Student:    ... or a microscope.
Teacher:   What's that? Speak up!
Students:  Well, it WAS difficult to see.
Teacher:    OK. Now did you stitch something high and lacy?
Student:    I stitched some areas high, like this white 'object'. I did not stitch any lace, but I made some holes, and look on the right, this is almost a face.

Teacher:   Hm. Well, I can see that you have stitched on plain fabric and in the style of free form.
Student:   This stitch reminds me of stump work and I think it could be used for a knitted stumpwork sweater, a muffler, even a funky hairstyle or a disastrous perm....
Teacher:   Hm, I'd say you need much more practice before you have mastered needle lace making. However, these 'objects' would make an interesting piece of modern free form embroidery or indeed a stump work portrait, and as the stitch was to be used as a 3D embroidery stitch, I'll accept it.
Student:   So I don't have to do my homework again?
Teacher:  No, you don't need to, but should you find the time, I'd be happy to see you use this stitch again in a creative way.

Sunday, 26 March 2017

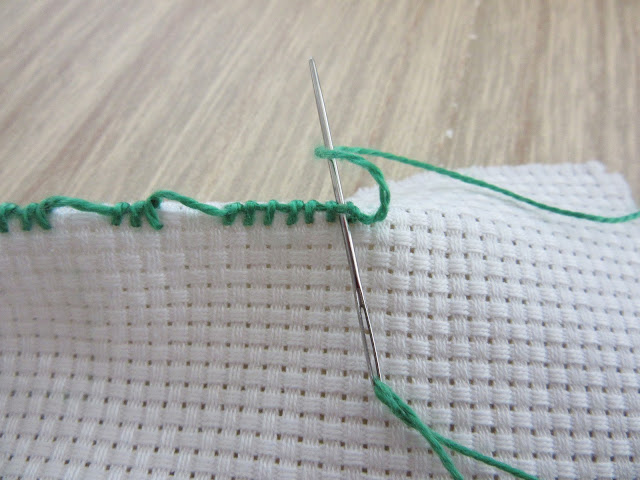
Sunday Stitch School - Lesson 16: Puncetto Valsesiano Stitch

Welcome to another lesson at Sunday Stitch School. What's on offer today? Well, I thought it was time to play with a needle lacing stitch.

Only a needle and some thread is needed to make the decorative Puncetto Valsesiano needle lace from the Valsesia region in Northern Italy. Most commonly it is worked in white, but the Mastallone Valley folk costumes are often decorated with coloured PV needle lace.

Interested to know more? Read this article by Google Arts & Culture.

Instead of making a lace doily, snow flake square or parts of a folk costume, I want to use the Puncetto Valsesiano Stitch as a 3D embroidery stitch.

Work it like this:
 First fold the fabric you are working on and stitch right on the fold.

First work from left to right.


To make an open space skip a few stitches while leaving a loop of thread.

When it is time to work the second row don't turn the work over, instead stitch from right to left. Go between the knots, not catching any of the fabric this time.


Work new knots on the loops on the return journey.

Work the third row left to right by inserting the needle between the knots.


A note on the twist of the thread. In the examples above I have used perle 8 which has an S twist. (Read more about S and Z twists at Needle 'n Thread.)

When you stitch from left to right with an S-twisted thread, the thread twists itself a bit tighter. When you stitch from right to left (on the return journey) the thread untwists itself. 
In both cases, you need to either let the needle and thread dangle for a short time to regain the right twist, 

or 
you need to learn to roll the needle between your thumb and index finger in a clockwise and anti clockwise direction.
Anti clockwise for left to right stitches.

Clockwise on the return journey.

It IS confusing! With practice you can control the twist 'automatically'.


Homework:
Pay attention to the tension, the twist and leave enough room in each knot to insert the needle on the return journey.
Stitch something high and lacy, 
and in the style of free form, 
and on plain cloth.