Sunday 30 April 2023

Sunday Stitch School - Lesson 249: Fly Stitch Rose

It's time to do a ribbon embroidery stitch, don't you think? Fly Stitch Rose. 

This stitch can be found in many places. Sharon Boggon has a nice picture tutorial in her book 'The Visual Guide to Crazy Quilting Design'. It is often found worked in stranded floss or other types of 'ordinary' embroidery threads. Then the stitch seems to be called Woven Rose or Woven Spider Web Rose.

Arts&Design


All these names give you a hint of how the stitch is worked: A Fly Stitch + needle weaving in a circle.

Let's have a look. Make a circle

with five points evenly spaced.


Fasten the extend Fly Stitch on the back.


Work the rose with ribbon for ribbon embroidery.


Weave the needle over and under the legs.


Let the ribbon twist and scrunch up for 

a realistic look.


Anchor the stitch on the back.


Isn't it beautiful? Can you smell the fragrance?

Homework: Add here:


Friday 28 April 2023

Friday Homework for Lesson 248: Surrey Stitch

A heartfelt THANK YOU to all who have given advice on how to make the loops of Surrey Stitch even and neat.

A ruler or a pencil are good aids, and I remember from my childhood when my mother and grandmother made rya rugs that they used a special ruler. 

The memory of Rya rugs brought back a more recent memory, which should have come back to me earlier - that of making #93 Rya Stitch four years ago!

At that time I used a pin, and that is what helped me with this week's Surry Stitch, too.


Working in the hand instead of in a hoop gave me more flexibility to get the needle underneath the pin.


Here are the samplers:

Aida Sampler


Sunday Stitch School Reference Chart


Mottled Wool Scribble Cloth


I enjoyed making these samples and can now say that I like Surrey Stitch!  

So here is a note to self: Never give up! Never think that things remain permanent - even your dislike of a stitch! Viva Stitching!

Wednesday 26 April 2023

WIPW - Preparing Waste Canvas

I had a few pockets of time and made progress in my two Work In Progress Wednesday projects:

Mandala

I have started to add ovals made up of #97 Satin Threaded Chain Stitch, but to make them a bit more interesting I chose TAST#43 Magic Chain instead of ordinary Chain Stitch. I used a blue metallic thread for the Satin part of the stitch.


Sunday Stitch School Stitch Sampler

As can be seen in the photo, I am still working on the #230 Cone Bullion Knot Stitch. I have also prepared a piece of waste canvas for the next rectangle. I plan to use some of the counted stitches. Watch this space!


Sunday 23 April 2023

Sunday Stitch School: Lesson 248 - Surrey Stitch

One part of learning is to accept and endure things you encounter and find you do not like. Of course, you have the choice to give up or skip a subject you dislike, anyway in free education and when you study by yourself!

On the other hand, if you choose to plod on, you a) will know for sure you dislike the subject matter, b) may learn to like it after all, and c) you will definitely have the right to feel proud that you fulfilled what you had set out to do.

Naturally, all this applies to embroidery and new stitches, too.

Today we have a stitch I have to admit I do not like. It is a canvas stitch with loops - Surry Stitch. I found it in two of my books, The Embroidery Stitch Bible and Mary Thomas's Dictionary of Embroidery Stitches.


Basically, it is an easy stitch, if you keep two things in mind.

1. The needle goes in two directions, up to down,


and right to left.


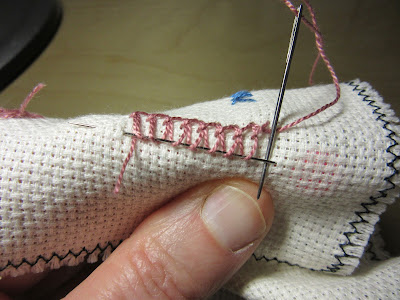
2. The needle always goes on top of the working thread:


Keeping those things in mind can't be that hard.
So what makes the stitch so troublesome? Well, it's all about tension and thread length. You have to try to keep every loop even in length.

Here is my photo instruction:
Start with a vertical stitch.

Leave a tail.

Pull the tail downward.

Make a horizontal stitch 
over the working tread

The first stitch is complete. Easy-peasy!

Make another vertical stitch.

NOW, form a LOOP the length
of the tail, and make the second 
horizontal stitch.

You have made your second stitch.

Repeat.


When you reach the end of your
stitching line, cut the thread, 
leaving a tail.


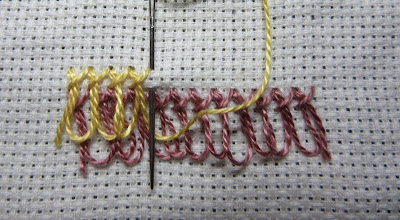
The Surry Stitch is neat and tidy on the back.

A second row is worked just above the first. Now you have the old loops as well as the new ones you are going to form to keep in check!


For clarity, I worked them in yellow.


Homework:
Apart form adding to the usual three samplers, try to find a way to stitch evenly!
Leave some loops as they are and cut open some, comparing the different looks.