Showing posts with label Hatamusubi. Show all posts

Friday, 20 September 2024

Friday Revision Homework - Stitches 296 - 300

After a long sickness leave, I am now back on track with Sunday Stitch School. Here is the revision homework for stitches 296 - 300.

Let me start by showing this picture of Sunbonnet Sue that I made for stitches 26 - 30,  in 2017, August 4


It inspired me to make a similar scene.  

Sue has changed into a skimpier bikini but is still lapping up the last of the summer's sunshine while sipping on another cool drink.

Here goes:


Tokyo has been extremely hot this summer, and most people say they are exhausted. Finally, we seem to be in sight of some cooler weather. I hope I will regain my energy and have a productive autumn.


Sunday, 1 September 2024

Sunday Stitch School - Revision: Stitches 296 - 300

We have now reached the 300 stitch mark and it is time to revise the last five stitches before we go on to further stitch adventures.

Click on the title to go to the instructions.


296 Rhodes Rectangle Stitch

It's yet another version in the Rhodes Stitch collection.


297 Raised Cup Stitch with Twisted Chain

Round and dome-shaped, it is a good stitch when you want something textured.


298 Hatamusubi

This is a Japanese knot used in Sashiko for joining two threads invisibly on the reverse side of the work. I think it can be used on the front, showing off the knot.


299 Backstitched Trellis Stitch

Do you want to use up a lot of thread? Here is the perfect stitch for you. All that backstitching will soon gobble up your thread!


300 Ring Picot Stitch

The Ring Picot is a nice edging stitch.


Homework:

It is Show Time for Sunbonnet Sue. What is she engaged in at this time I wonder?


Ah, those sharp lines look like floor tiles in a bathroom!
Ha, they are NOT! Actually, the lines will be slightly softer.


Friday, 16 August 2024

Friday Homework for Lesson 298: Hatamusubi

Making this knot to join two ends of thread is a bit fiddly if the ends are short. I recommend changing the thread while there is still enough left to hold on to.

I worked both the back and front of the stitches in these samplers, to show how they look both ways. Sometimes I cut the thread ends very close to the knot, sometimes I left the ends in takt.

Aida Sampler


Sunday Stitch School Reference Chart


Mottled Wool Scribble Cloth


Sunday, 11 August 2024

Sunday Stitch School - Lesson 298: Hatamusubi

This can not be called an embroidery STITCH, but is a KNOT used in sashiko stitching.

Those who are already familiar with the Japanese running stitch embroidery called Sashiko know that the thread is often not knotted. Instead, a form of double stitching is used leaving some stitches slightly thicker than those that have not been worked twice.

There is, however, a knot used to discreetly join an old and a new thread on the reverse of the fabric. This is called Hatamusubi.

Hatamusubi is also used in weaving (Weaver's Knot) and as a nautical knot, it is known as Sheet Bend and Beckett's Bend.


I have two sources for you to check. 

A Japanese blog with a diagram and a video. It is easy to understand.

A YouTube video by Stephen Rowley from the UK, showing and describing the work in English.

Here are my photos:

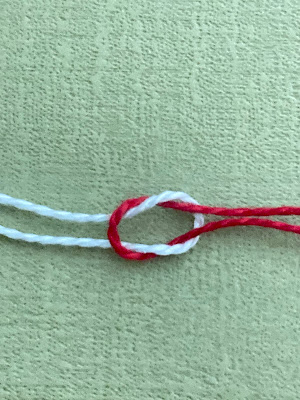
First, let's compare the well-known Square Knot or Reef Knot (white and red)


with Hatamusubi, or Sheet Bend, Beckett's Bend or Weaver's Knot.

You can see how the blue thread is crossed over.

Making these knots with a LONG thread (or rope) is not so difficult. 
The trick is to join a very short thread end with the new thread.


So for today's instructions:
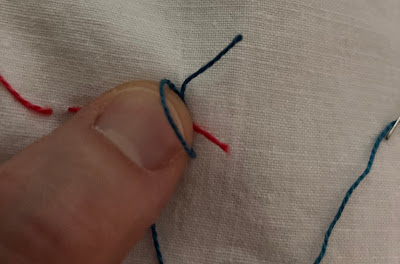
You have reached the end of your thread (red) 
and only a little bit is left. 
How can you join it to the new (blue)
thread?

Place the (blue) tail under the (red)
end.

Press the crossed threads together with your thumb.

Make a loop by taking the (blue) thread under 
the (blue) tail and over the (red) tail.

Place the threads as close together as possilble.

Bend the red tail over both blue
threads.


Hold the tails down with your thumb.

Pull the blue working thread, then grab 
the red tail and pull into a tight knot.


Snip off the tails as close to the knot as you
can.


Continue with your stitching.
You can see a small bump on the back but,

on the front, there is no sign of the 
change of thread, which means it is
a very useful trick.


How can we use Hatamusubi as an embroidery STITCH?
THAT will be this week's homework on these samplers: