Showing posts with label What's In A Quilt. Show all posts

Wednesday, 29 May 2024

WIPW - A Book Cover

 Here is this week's Work In Progress Wednesday report. I am happy to say I managed a lot of work.


Rescuing the Sweater

I completed the restoration work on both sleeves and can now pack away the sweater together with some mothballs. In autumn it will be lovely to once more put it on. I hope to wear the sweater for many more years to come.


Book Cover

I made a simple birthday present - a notebook cover. This pattern is for a reversible cover - the lining can become the outside cover if you turn the cover inside out. 

I had a piece of blue and white gingham check (used for the lining), a remnant of kimono cotton (Yukata) for the pockets and a fat quarter with a charming print designed by Mutsuko Yawatagaki. 

Ms Yawatagaki is a famous quilter who usually works with kimono silks. She operates a charming quilt art museum in the countryside and I bought the fabric from the museum shop some years ago. I was happy to use the fabric for this book cover.


By the way, my friend Pamela of Hokkaido Kudasai, made a beautiful wall hanging with fabric from Ms Yawagataki's collection.


Sunday Stitch School Stitch Sampler

I added one more stitch, #288 Fairy Lights Stitch to my sampler of Sunday Stitch School stitches. 
Rachel of Virtuosew Adventures pointed out that metallic thread would be good for the Fairy Lights Stitch. She is so right! The lights glint and glow!


I threaded the needle with three colours and started with red metallic. After three 'lightbulbs', I switched to the blue thread, and so on. The non-visible threads are wrapped over the Running Stitch on the back of the fabric.


The Green Man - Final Work

Do you remember What's In A Quilt - The Green Man?


Click on the link to see the start of the embellishment of the bias tape.  

Life got in the way and I never completed the Herringbone stitches. Until now that is. I started on the embellishments again, finished the HB stitches and began adding French Knots.


A New Start - Hexablooms


So many bloggers work on Hexagon quilts. Whenever I see these English Paper Pieced quilts I feel an itch in my fingers - I want to make such a quilt, too! The problem is finding time for quilting...

Then I threw caution to the wind and decided to indulge in a SLOW project. 
I will collect any piece of scrap cardboard, e.g. food containers, that otherwise would end up in the recycle bin, and cut out hexagon shapes. 
I will then make use of the many small scraps of fabric I have in my stash to make flowers for my Hexablooms quilt.

It will be a SLOW project, without any time limit, I might be working on this new quilt, a large one, for 10 years or more! No pressure allowed!


Thursday, 7 December 2023

What's In a Quilt - The Green Man - Part 18: Embellishing

 I had high hopes for stitching a lot, but life got in the way. Why is December always so busy?

I only had time to stitch two strands of thread!


Thursday, 30 November 2023

What's In A Quilt - The Green Man - Part 17: Mending

 Do you remember the tear in the Stained Glass block? Well, I just had to mend it.


That was easy and quick.

So easy and quick that I could go on and add a bit more delight to the Green Man. After all, I still had the needle and thread by the ready. Why not embellish the bias tape with embroidery? I've done it before on another quilt:


I started with a simple Herringbone Stitch.


To be continued ...


Thursday, 23 November 2023

What's In a Quilt - The Green Man - Part 16: Quilting

Finally, we have come to the quilting of the Green Man. There is very little quilting in many of the blocks themselves but the border has a meandering leafy pattern à la William Morris. 

Before I started the quilting I drew in the stem and leaves, then I used a thin brush and a diluted bleach solution to follow the drawn line. I then quilted using a short Running Stitch. 

Taking out the quilt from the closet to write the story of the Green Man and to document the various techniques I have used, I wanted to show off the quilting line more. 

As I can never say no to embroidery I decided to use the Running Stitch as a base and make the stitches more prominent. What better to do than whipping them?


To be continued ...

Thursday, 2 November 2023

What's In a Quilt - The Green Man - Part 14: Slash Quilt

Today we will look at a type of quilt where you cut the fabric in a special way - you slash it! 

For pieced work, like we saw last week, most quilters don't cut fabric with a pair of scissors. Instead, they use a rotary cutter, a ruler and a cutting mat.


There is a special rotary cutter on the market, called a slash cutter.


So let me illustrate the technique for making a slash quilt.

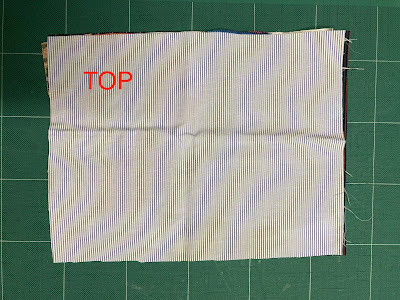
First, make a pile of several sheets of fabric. The top and bottom sheets must be whole and in good condition. In between them, you can place pieces with small defects, ugly prints, and stained or worn fabric.


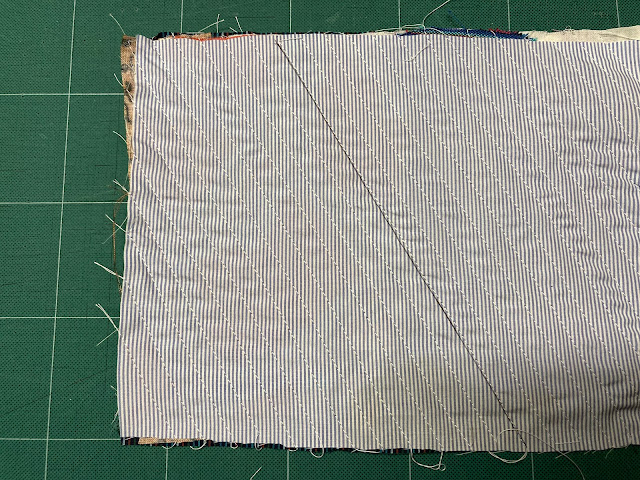
Draw a diagonal line across the top and stitch, by MACHINE, a straight line. Parallel to it, stitch another one, and another one, till you have covered the whole top.


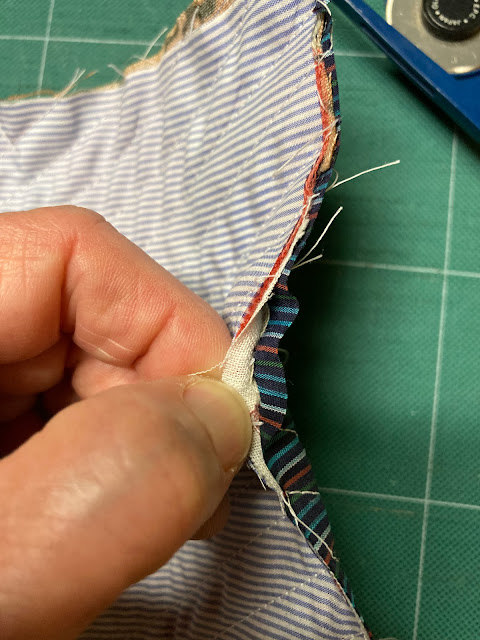
Take the slash cutter and insert the plastic 'finger' in the 'tunnel' between the bottom sheet and


the rest of the layers

Slice your way to the other end of the tunnel.

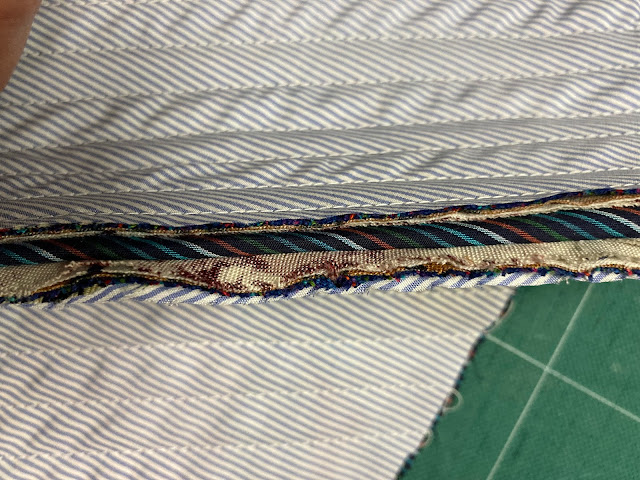
As you can see the bottom fabric is intact, and all the other layers are raw-edge cut.

Continue until you have 'ploughed open all the furrows of your field'.

Now give the 'field' a good rub. 
Actually, you can moisture the top with a mist of water, toss it in a tumble dryer and then you will get a very 'furry' surface.

You can, of course, cut open the tunnels with a pair of scissors, but you have to be VERY careful. Cut slowly and double-check that you are keeping a straight line and not cutting the bottom piece.

.......................................

So if you paint the Green Man on the top piece of fabric, and then cut through the layers you get this:


Thursday, 12 October 2023

What's In a Quilt - The Green Man - Part 11: Stuffed Appliqué

The eleventh block I will show is simply an appliqué face with stuffing inside the leaves. 

First I appliquéd the leaves using needle turn but left a small opening into which I fed the wadding. After closing the opening I did the quilt stitching on the leaves thereby keeping the stuffed wadding in place.


To be continued...

Thursday, 14 September 2023

What's in a Quilt - The Green Man - Part 7: Painted Quilting

First a correction about the blogpost 'What's in a Quilt - The Green Man - Part 2: Whole Cloth' posted on August 10th, 2023.

I used this picture to illustrate my whole cloth quilt block. Do you remember?


'Yes! I've already seen this block', you may say. You are right, but I made a mistake!  A SILLY  mistake!!!!  Although it technically IS a whole cloth, being worked on a single piece of fabric, it was the wrong one.

Below is the whole cloth quilt block that should have been used to illustrate 'What's in a Quilt - The Green Man - Part 2: Whole Cloth'

As you can see, it is only one piece of fabric, and the whole Green Man's head is quilted on a piece of green sheeting.

I have now updated that blog post with the right photograph.

....................

Now back to today's blog post.  Block #7 is not only a whole cloth quilt, more importantly, it is a sketched and painted quilt as you can see here:


I quite often take the help of paint or crayons to fill in parts of my quilting. Here are a few examples:

Sunbonnet Sue's dress and her Christmas tree are coloured with crayons.

Another Christmas quilt, this one in the style of a stained glass window quilt. It is all paint except the candle which is the foundation fabric untouched!


A fake crazy quilt, all the pieces were drawn with ink pen and then coloured in with children's wax crayons and finally set with a hot iron. The embroidery is real, though.


For NHK's Partnership quilt project 2006, I painted the sailboat on a piece of pink fabric, then appliquéd the rainbow-coloured batik and the palm leaf.

Another vessel, a steamship, is still used for commuting between Stockholm and the islands in the archipelago. The leafy background, the water and the mallard - are all done with paint on a sheet of white fabric. Only the ship's hull is the original white foundation fabric.

The flowers, leaves and garlands on this Block Of the Month quilt are drawn with wax crayons.

So what is the merit of painting? It is the ease of quilting. Appliqué and piecing mean you have seam allowance which leads to bulk. That bulk makes it harder to do the actual quilting, especially even quilting. If you fake it with paint or crayons and hope that from a distance the motif will look like proper appliqué, you can easily quilt through the three layers without having to struggle with any bulk or bumps.


Here is some of the stuff I use:


To be continued...


Thursday, 7 September 2023

What's in a Quilt - The Green Man - Part 6: Buttonhole Appliqué

Today I want to talk about raw edge appliqué and Buttonhole appliqué.

How many stitches are there in the Buttonhole Family? Well, there are MANY, that's for sure!

In TAST (Take A Stitch Tuesday, the stitch tutorial and stitch challenge held by Sharon Boggon of Pintangle) I learned 25! variations of Buttonhole, or Blanket Stitch, not including the beaded versions. 

In my own Sunday Stitch School project I have introduced 14.

Now, not all of these 39 stitches are suitable for along-the-edge appliqué. Actually, many stitches with 'Buttonhole or Buttonholed' in the name feature detached buttonhole stitch, i.e. a Buttonhole Stitch has been worked over a THREAD, and not biting any of the foundation fabric, for example, a Cable Chain Stitch, as illustrated below.


Most of the other Buttonhole stitches can be used, though. Here are a few examples:


The point with Buttonhole Appliqué is that you don't need a seam allowance. Instead of turning in the allowance, needle turn, you can anchor the raw edge with a line of Buttonhole stitches. 
To keep the fabric in good condition, why not fuse the patches to the background first, then stitch along the edge?

Raw edge appliqué has its disadvantages of course. Eventually, the edges will fray, especially if the quilt is washed and handled a lot.

Many sewing machines have a Buttonhole Stitch, so it is also popular for machine quilting.

My Green Man looks like this:

.....................................................................
To see the Buttonhole Stitches in my collection you can find them in the lists below and by clicking these tabs:


TAST
#2 Buttonhole
#17 Crossed Buttonhole
#22 Buttonhole Wheel
#25 Bonnet
#26 Up and Down Buttonhole
#36 Knotted Buttonhole
#40 Buttonhole Wheel Cup
#46 Buttonhole Eyelet Flower
#55 Buttonholed Herringbone
#61 Up and Down Feathered Buttonhole
#64 Top Knotted Buttonhole
#65 Buttonhole Bar
#69 Buttonhole Double Chain
#71 Bullion Buttonhole 
#87 Buttonhole Picot Bullion
#88 Buttonhole Picot Chain
#94 Reversed Buttonhole Bar
#101 Triangular Buttonhole
#104 Buttonholed Cable Chain
#105 Alternating Buttonholed Cable Chain
#126 Alternating Up and Down Buttonhole
#128 Interlaced Up and Down Buttonhole
#136 Knotted Buttonhole Band
#141 Fancy Bobbin Edging

SUNDAY STITCH SCHOOL
#27 Buttonholed Buttonhole
#48 Detached Up and Down Buttonhole
#55 Tailor's Buttonhole
#66 Berwick
#96 Buttonholed Fly 
#134 Slanting Blanket 
#167 Fried Buttonhole
#176 Buttonhole Cross
#197 German Blanket
#207 Plaited Edge
#214 Threaded Blanket
#215 Up and Down Crossed Buttonhole
#247 Scallop Blanket


There are still Buttonhole stitches that I have not introduced in Sunday Stitch School yet!