Sunday 29 October 2023

Sunday Stitch School - Lesson 270: Spaced Buttonhole Filling Stitch

 This version of the Buttonhole Stitch was found in  Mary Thomas's Dictionary of Embroidery Stitches.

You can work it fixed to the foundation fabric or detached. Today we will work the former.


In the first row, work from left to right.

Make two Buttonhole Stitches next to each other,


Make enough space to evenly place two stitches in the row below.

Make two more stitches.


Continue this way to the end of the row.

Anchor the last stitch

Work a similar row below the first one, but 
work from right to left.

Anchor the last stitch.

The closer you place the stitches, the more 
of the foundation fabric will be filled.

Spaced Buttonhole Filling Stitch is easy and fast. Enjoy it!


Friday 27 October 2023

Friday Homework for Lesson 269: Queen Stitch

These stitches are difficult when done on a small scale and if worked with white thread on white linen you have to look very carefully where you insert the needle. On low-count Aida, Queen Stitch works up like a breeze. There it also looks tidy! 


Aida Sampler


Sunday Stitch School Reference Chart

Despite using waste canvas these stitches do not look neat. I can't have stretched the foundation fabric tightly enough in the hoop as the stitches seem to have shifted. Queen Stitch is obviously a canvas stitch which should be on well-stretched canvas.


Mottled Wool Scribble Cloth

I had learned the lesson about lack of tension in the previous picture, so for the mottled wool I kept the fabric as drum tight as I could and then attached the waste canvas carefully.  Now it was far easier to get an even look.

The colourful part makes me think of a Harlequin costume.


Thursday 26 October 2023

What's In a Quilt - The Green Man - Part 13: Pieced Work

The most common type of all quilts must surely be those made of small pieces of fabric stitched together - with the appliqué quilts coming in second place.

I have no idea how many patterns there are for pieced blocks but I guess there are thousands and thousands. I am sure you have heard names like Log Cabin, Double Wedding Rings, Tumbling Blocks, Drunkard's Path, Star of Bethlehem, The School House...

Here are a few examples from the shows at Tokyo Dome:


So for the 13th Green Man block I give you a postage stamp-style block. This type of quilt is made of very small pieces, as the name suggests, and usually of many different prints all jumbled together - a true scrap quilt.
Mine is slightly different, I have used the small size of the pieces, but have selected the fabric carefully and built the face of the Green Man with them. I used remnants from an old corduroy shirt, too. It is not the easiest of fabrics to include in patchwork, especially on this scale. The pieces, which measure 2cm x 2cm, are all hand stitched. There are squares and a few triangles, and the mouth is made out of three small rectangles, that together measure 2 x 2 cm. For the eyes, I used Japanese tenugui fabric.


To be continued...


Wednesday 25 October 2023

WIPW - Four Stitches Added

 For the Work In Progress Wednesday report I can show you four stitches added to the 

Sunday Stitch School Stitch Sampler

The sawtooth-like lines in pink at the top are #38 Bosnian Stitch. The yellow A-shaped detached stitches are # 47 Two-sided Insertion Stitch. #248 Surry Stitch in red and green have loops, uncut and cut. Finally, in aqua there is #255 Mirrored Chevron Stitch.


Mandala
I have now added Basque Stitch around half the Mandala.


Sunday 22 October 2023

Sunday Stitch School - Lesson 269: Queen Stitch

Queen Stitch is an old stitch, also known as Rococo Stitch, and is similar to #18 Renaissance Stitch which I blogged about in April 2017. It has three vertical lines and is stitched in a different way from Queen Stitch. In the many books I have checked, there are various names. If you are interested there are two entries to read about #18 Renaissance Stitch: Lesson - Homework

However, today's stitch is Queen Stitch, with four vertical lines. Royal School of Needlework's Stitch Bank site has a lot of information which also includes an easy-to-follow video tutorial.

I made this photo version:


Isn't it nice?

Work the next stitch to the left.

Work the second row underneath, between the Queens of the first row, so you fill the entire area.

Go on, give them a try!


Homework:
Invite as many queens as you can to these samplers. Also, the Canvas Sampler may like a royal visit.


Friday 20 October 2023

Friday Homework for Lesson 268 - Donut Drizzle Stitch

I admit Donut Drizzle Stitch IS a fiddly stitch, but it is also one full of potential. The nice-looking ones can be used for flowers and the others for realistic donuts! For example, look at the various odd shapes in the Aida Sampler. Some of the Donut Drizzle Stitches could be perfect donuts, while some seem to have bite marks and others look crushed, maybe the box they were in was dropped...

People who build dollhouses often use plastic or wooden scraps and odd bits and bobs to create all the things that add 'life' to a room. You know, toothbrushes and soap dishes for the bathroom, pencils and writing pads for the telephone desk, pokers and rolled-up newspapers for the fireside, chicken drumsticks and a head of lettuce for the kitchen...

Salley Mavor is famous for building fantastic scenes with felt and stitches. Have a look at this blog entry

So I think that with the right embroidery stitches, we can create realistic scenes. If I were to depict the remains of a kid's donut party I would use untidy Donut Drizzle Stitch for the half-eaten donuts!


Aida Sampler

Some are untidy others are well-behaved!


Sunday Stitch School Reference Chart


Mottled Wool Scribble Cloth


Thursday 19 October 2023

What's In a Quilt - The Green Man - Part 12: Netting

The Green Men you find in old churches are often lurking in dark places. To make that blurry, cobwebby, soft and muted effect for my next Green Man block I used a special technique - layering it with a sheer fabric.

This technique is also used for the famous Happy Village quilts taught by Karen Eckmeier where raw edge scraps of fabric are used to build a village scene. These pieces are lightly glued in place to the foundation fabric. After a sheet of tulle has been placed on top, the whole scene is then quilted down.

Here you can see a city I made with that technique.

I also saw a fantastic portrait of a cat at one of the quilt shows in Tokyo Dome. From a distance, the fur really looked real and very 'touchable'. The effect was produced by tulle.


Below is a detail.


I used not tulle but a fine polyester on top of a painted Green Man.


This is another whole cloth quilt, not a single patch was used! I had to use strong colour paint so the netting would not take too many of the features away.

To be continued ...


Wednesday 18 October 2023

WIPW - More of the same progress

The Work In Progress Wednesday is filled with more of the same:


Mandala

Basque Stitch continues to work its way around the curved edges of the Mandala.


Sunday Stitch School Stitch Sampler

I added #238 Looped Blanket Stitch for a dot (blue/yellow/green) and #251 Frilled Buttonhole Stitch for a circle (orange and blue).


Sunday 15 October 2023

Sunday Stitch School - Lesson 268: Donut Drizzle Stitch

Today's stitch, Donut Drizzle Stitch, is based on the Drizzle Stitch of course, and inspired by Brazilian flower embroidery. I found it at Rosalie Wakefield - Millefiori's blog. You can see her photo instructions there.

Mine are below:

Stretch the foundation fabric tight in a hoop.

Make a knot and take the thread out from behind.


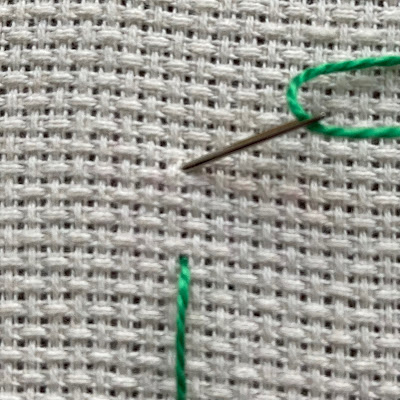
Stand the working needle (A) straight up, close to where the thread came out, then remove the thread from the needle.


It's a good idea to stand the needle in a firm pin cushion.


To make the drizzle stitch, first, make a loop like this:

Then place the loop over the needle.


Pull the thread around the needle

until you get a tight knot.

Make a good number of looped knots.


Now we come to the donut part - insert an extra pin or needle (B) in the TOP loop.


Re-thread the needle (A), remove it from the pin cushion and pull it down 


through the loops and through the fabric. Keep the extra pin (B) in place.


Take the working needle (A) out again and


insert it in the top loop next to the extra needle (B).


You can now remove the extra needle (B).


Pull the threaded needle (A) through the top loop and the drizzle will become a round donut.


Anchor the thread.


Some donuts are misbehaving and stand up.


You can pin them down


Homework:

Add here.