I thought it was time for a challenge stitch, one of those I have tried and failed many times, and stubborn as I am, just felt I needed to master. It is the Braid Stitch, and also goes by the names of Cable Plait Stitch, Gordian Knot Stitch, and in Swedish, Bandstygn. French names: Point de Galon or Point de Nœud Gordien.
In most illustrated embroidery books there is drawing of the Braid Stitch,
like this:

Although very clear I have never managed to control the twist of the thread.
Then I checked Mary Corbet's Braid Stitch video tutorial over at Needle 'n Thread.
It looked so easy, I just had to try it her way.
It was easy, and after a couple of stitches, truly addictive, and fast, to boot!
This is how it is worked:
Draw two parallel lines.
Tighten the fabric in a hoop.
Work with both hands.
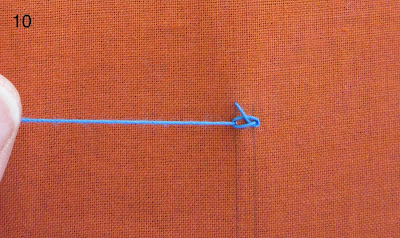
Come out on the left and hold the thread tight.
Wrap the thread over
and under the needle.
While keeping the thread tight, insert needle on the right line,
and come out on the left one.
Pull the thread to the left and under the tip of the needle.
Tighten the thread again.
Pull the needle through
carefully so you don't loose the shape.
You have your first stitch.
Repeat from 1) in the same way

until you have a line.
Once you got the rhythm, you can't stop!
This is what it looks on my Aida sampler.

All books say the Braid Stitch works well on curves, it performs best with a thread that has a good twist,
and my opinion is that it looks neatest if rather crammed together and not too long.
Homework:
Do some penmanship! 'Write' a letter on this letter printed fabric.


20 comments:
Great instructions!
Nice one! I can see how it might become addictive.
Your explanations are very clear.
I have been looking forward to learn this stitch. Thanks for clear instructions. will try soon.
It looks an interesting stitch and great instructions.
I love this stitch on a straight line and will be interested to see how you go with the curves, a bit of a challenge there. Thanks for explaining the the tension.
Encore un très joli point
le nom français est :
point de galon ou point de nœud gordien
Le point de la semaine dernière est :
point de Holbein ou double point avant
Mattia
Thank you, I have updated both posts.
I guess the secret is to keep the stitches short and tight. I have done the design, and will now 'write' something.
I am delighted to have found an easy way to do it, as I like the look of this braid.
I am sure you will like it, but be sure to put the fabric in a hoop and use both hands.
I am glad you think so.
It's like potato chips, start eating and you can't stop!
I am happy to hear you say that.
Yes, it's a lovely, ornamental, characterful stitch. Good to have in your repertoire.
I am particularly fond of rich and thick stitches, like this one, that makes a nice braid or cord.
Wonderful stitch tutorial! Kisses, my friend.
Give the stitch a try!
Another tricky stitch! I remember stitching this and it went wel. But the big loop didn't stay that well after adding other stitches. It's one of my I-tried-and-don't-like stitches!
You are right, I can't imagine using this stitch on something that would need a lot of washing and 'manhandling', like bedlinen or towels. Greeting cards or framed pictures it the best place for the Braid Stitch!
Post a Comment