Showing posts with label Indian Herringbone Stitch. Show all posts

Friday, 24 July 2020

Friday Revision Homework - Stitches 136 - 140

Here is Sunbonnet Sue practicing social distancing. She is chilling out in the Waved Chain Stitch waters of an isolated lake in the middle of nowhere. On the shore Sycamore Stitch plants are growing. Waved Chain Stitch butterflies are fluttering around her and the Tied Windmill Stitch sun is giving her skin a bit of a tan.
Sue has dressed up in her Indian Herringbone Stitch sundress and her Brick Stitch sunbonnet.


Stem Stitch was also used for outlines.

Sunday, 19 July 2020

Sunday Stitch School - Revision: Stitches 136 - 140

It is time for a revision lesson to look at the last five stitches.
Click on the title to see instructions and previous posts for each stitch.

136 Tied Windmill Stitch
This is a beautiful stitch and can be made into different shapes.
Change the spacing, the length of the arms, the placement of the cross, the thread colour, weight and type, and the sky's the limit, as they say.


 137 Brick Stitch
For an even look use a weave with a good grid.


138 Waved Chain Stitch
So easy, so impressive. This is a stitch well worth learning!


139 Sycamore Stitch
A Lego stitch, use it to build various motifs.


140 Indian Herringbone Stitch
This makes such an attractive woven look, perfect for the image of checked tweed etc.


Homework:
It is time for another Sunbonnet Sue sampler.
This time I made use of my molding pads, and fabric crayons to make part of the scene.

Friday, 17 July 2020

Friday Homework for Lesson 140: Indian Herringbone Stitch

Fun and beautiful, but you need to keep the weaving in mind, so concentrate.

Aida Sampler

Sunday Stitch School Reference Chart


Teal Wool Tailoring Scribble Cloth


Sunday, 12 July 2020

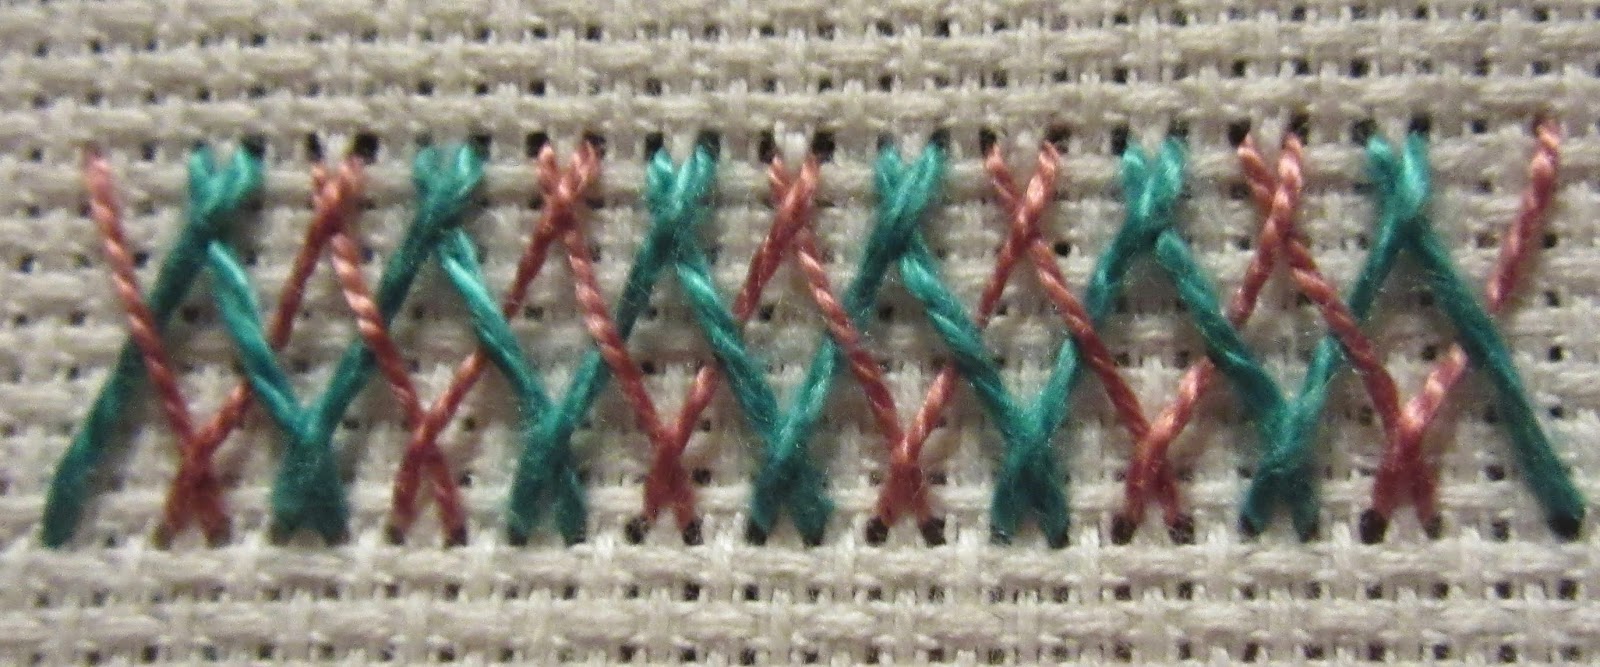
Sunday Stitch School - Lesson 140: Indian Herringbone Stitch

Hello. Let me introduce you to one of the many members of the Herringbone family - Indian Herringbone Stitch.

It is made by weaving together two sets of Herringbone Stitch and looks especially good when two different threads/colours are used.

I found the stitch at Sarah's Hand Embroidery Tutorials.

Stitch it like this:
Make an ordinary Herringbone Stitch,
starting at the bottom left.

but take the needle under
the left leg,

and over the right leg (this is usual).

Continue until you have as many
stitches as you need.

Change to a different thread, I used pink,
and make the mirrored stitches,
starting at the top left.

As you can see, the pink thread goes over
the green on the left, but under on the right.


Continue weaving in the same way.


Homework:
Work on the samplers.