Showing posts with label Reversed Chain Stitch with Buttonhole Edging. Show all posts

Friday, 14 June 2024

Revision Homework for Stitches 286 - 290

When I first saw a stitch with the name Fairy Lights, I knew that Sunbonnet Sue would want to become a fairy, for a day at least. 

So here she is lighting the magic light bulbs and stretching garlands across the garden.


Other stitches used: Stem Stitch for outlines, Seed Stitch and Colonial Knots for accents.
The Armenian Edging is stitched over a ribbon that is attached at the top to the base fabric.

Sunday, 9 June 2024

Sunday Stitch school - Revision: Stitches 286 - 290

It is time to work the last five stitches again and add them up on a Sunbonnet Sue sampler.

Click on the title to see the instructions.


286 Reversed Chain Stitch

This way of making the Chain Stitch might take a bit more time compared to the traditional  'in-the-hand' stitching and of course, the fabric needs to be stretched in a frame or hoop, but the stitches become even and neat.


287 Reversed Chain Stitch with Buttonhole Edging

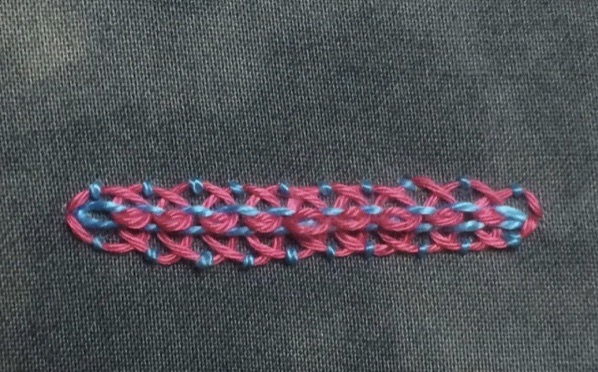
Building on the previous stitch, just add laced loops on both sides of the chain and you get this beautiful braid-like stitch.


288 Fairy Lights Stitch

This is a magical stitch perfect for a scene of garlands of lights at a garden party. With metallic thread, you get a good glow.


289 Armenian Edging Stitch

Want some lace on the edge of a handkerchief? You don't have a crochet hook or a bobbin pillow with pins and bobbins? Fear not, you can embroider the lace!


290 Threaded Herringbone Stitch

I have found that there are two ways that the basic Herringbone Stitch can be embellished and called Threaded Herringbone Stitch. Here is the more unusual way. 

The other, which is more often seen, has also got another name and I will eventually add it to the Sunday Stitch School collection, then under its alternative name. That's for another lesson, though.


Homework:

Think up a good way to let Sunbonnet Sue get entangled with all these five stitches.


Friday, 17 May 2024

Friday Homework for Lesson 287: Reversed Chain Stitch with Buttonhole Edging

Reversed Chain has proven to be easy and adding Buttonhole stitches to the edges was not difficult either.

Personally, I like the Reversed Chain Stitch better than the standard Chain Stitch. It is important to remember that the former requires the fabric to be stretched in a hoop whereas the latter can be worked in the hand. Also that if you want to work quickly standard Chain Stitch is faster.

Now for adding Buttonhole Edging... you can of course do that to both stitches. 

Actually, I have already done a version of 'Chain Stitch with Buttonhole Edging' - #78 Interlaced Chain Stitch, see the tutorial here. In that version, you first complete the lacing, 


then anchor the loops with small stitches:


As you will see below, there is no difference in looks to the 'un-anchored' part so only the stitcher will know which type of Chain Stitch the Buttonhole lacing has been added to.


Anyway, here is today's homework:

Reversed Chain Stitch with Buttonhole Edging

Aida Sampler


Sunday Stitch School Reference Chart


Mottled Wool Scribble Cloth


Sunday, 12 May 2024

Sunday Stitch School - Lesson 287: Reversed Chain Stitch with Buttonhole Edging

Let's add more work on last week's stitch.  Reversed Chain Stitch with Buttonhole Edging may be a bit of a mouthful to say, but it is not hard to work! 

I found it at Baroque Embellishments, a blog run by Kimberly Servello. Rachel at VirtuoSew Adventures has also used this stitch. Both ladies were working on Gold Work projects. Here, I will try my hand at the stitch with ordinary Perle No 8.

Start by making a line of Reverse Chain Stitch.

Take a second thread, of the same or a different colour. Come out at the beginning of the chain. Take the thread up through the second link, and down at the first link, without going through the fabric. Look carefully at the picture to check that you have placed the needle correctly.


Move to the third link and repeat.


Anchor at the end of the line and

turn the work around and repeat the edging stitches.


Homework: Add here.