Wednesday 28 February 2018

WIPW - Finished - but for the edge

Work In Progress Wednesday shows how the

Crazy for Crazy
has been encrusted with more thread, beads, sequins.


The additions can be seen in the picture below.


I think this block is finished, but for the edge. I will add a bias tape edge around the hexagon shape and then get on to the next block, in a different colour way, hoping to learn some more tricks of the trade from Sharon Boggon's great book:

Sunday 25 February 2018

Sunday Stitch School - Lesson 52: Underside Couching

Welcome to an evening lesson at Sunday Stitch School where we will be learning another ancient way of using precious thread in a thrifty way.

Underside Couching was used to embellish the surface of fabric, while saving both the thread and fabric from wear and making the most of the expensive gold or silver thread.

French name: Point de Couchure (Thank you, Mattia)

I found the instructions in A-Z of Embroidery Stitches 2 to be clear with good pictures.

Still I wanted to add my own pictures where I have couched down a brown thread with a yellow one on a piece of Aida.

 Working from underneath, take the yellow thread out and into the same hole over the brown thread until you have a 'lasso'.

 Give the 'lasso' a bit of a tug until a bit of the brown thread enters the back.

continue in the same way.

Here you can see the Underside Couching on the back of the fabric.

Ha, that was more difficult than I first thought!
Here is perfect proof that Aida is not the best fabric to do the couching, and that the two threads should match in colour!
Lesson learned? Prove it by doing your homework properly!


The homework will be to:
Add a couple of rows on the SSS Aida sampler (be careful!)
Add Underside Couching to the SSS Reference Chart
Fill in a shape on the orange piece of fabric.

Saturday 24 February 2018

HINA 2018

March 3rd is approaching fast - it is high time I made some HINA ornaments for my mobile of hanging dolls.
If you have not heard of HINA before, read this.

Once again I made three new ornaments.


The monkey is a symbol of safety

You can learn how to make one from the pictures of this website.

I made a heart. This is not a traditional design, but to me it would symbolize the wish that one's daughter grows up to be a loving person.


I also made an empress dressed in several layers of kimono. Underneath the fabric is a clam shell.


I made it like this:
First I covered one shell with chirimen silk (crepe silk).


Like this.


Then I glued some white chirimen over the pointed tip of the other shell,  for the face.


The collar of the first kimono.


The second and third layers.


Over the forth (yellow) layer I dressed the clam shell with the right side of the outer kimono


and then the left side.

I then turned in the excess chirimen silk and stitch the two clam shells together, and drew the face.


Friday 23 February 2018

Wednesday 21 February 2018

WIPW - Buttons

Work In Progress Wednesday - I've got two reports:

Greeting Cards
I made two simple greeting cards.
One with buttons

and the other with silk thread


Crazy for Crazy


I added a plain button in a corner, and anchored it with Woven Picots. It is surrounded with Colonial Knots.

I made a spray of flowers with stems of Thorns Stitch and floral sequins, seed and bugle beads for the flowers.
 In another corner I fixed a heart of felt with Whipped Buttonhole Stitch and three Rambling Roses.

 More work next week.


Sunday 18 February 2018

Sunday Stitch School - Lesson 51: Tent Stitch

It is time for another history lesson at Sunday Stitch School.


We are today looking at one of the most common Needlepoint stitches, the Tent Stitch. It can be found in many stitch dictionaries, but I have referred to 'Elizabethan Stitches, A Guide to Historic English Needlework' by Jacqui Carey.

The Tent Stitch dates back to before the 16th century, and there are many surviving examples.

One important factor with most Elizabethan embroidery is the economy of thread on the back of the fabric.
Tent stitch is an exception, it uses more thread on the back than the front of the fabric, BUT there are several ways to work the stitch, some use more and some less thread. The variations also come with different names.

Traditionally the Tent Stitch was worked diagonally and is then also known as Needlepoint Stitch, Petit Point, Canvas Stitch, Perlen Stitch, Cushion Stitch and Basketweave Stitch.
The latter because of the basketweave pattern it makes on the back of the fabric.

Here is the traditional Tent Stitch worked diagonally:


...........

When worked in horizontal rows, it is known as Continental Stitch or Half Stitch, and uses less thread, but the thread can wrap itself too tightly around the weave, making 'holes' in the weave, so do pay attention not to pull the thread too tightly.

This is how it is done:


When you come to the end of the line you can either,

 
 stitch from down to up, or

 
turn the work around and, stitch like before, then

 turn again when you reach the end of the row.....

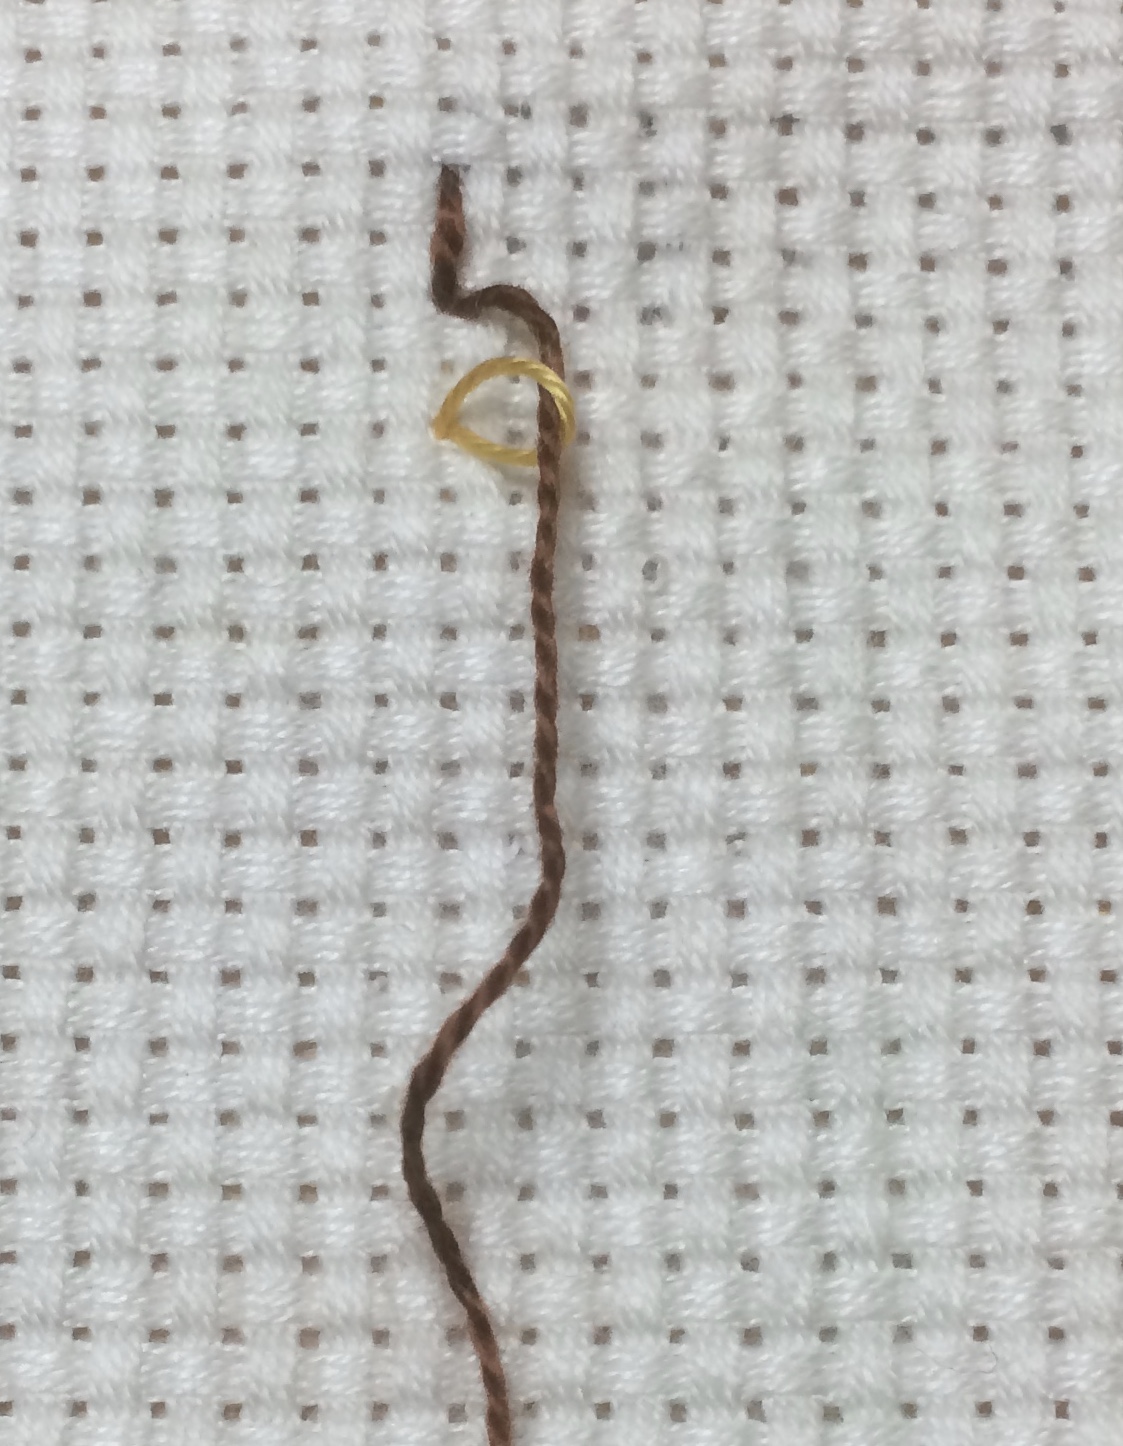
Look at this picture of my Aida sampler to see the difference on the back:
The top row of yellow stitches are Half Stitch, and leave a lot of white fabric to be seen.

The rows below show the basketweave pattern, and you can see how much more the fabric is covered.
When Needlepoint is used for a seat of a chair, the Tent Stitch with basketweave back would make a much stronger surface, suitable for the wear and tear of 'upholstery' stitching.

Homework:
Fill in a square on the fake canvas with Tent Stitch (stitched diagonally).


Friday 16 February 2018

Friday Revision Homework - Stitches 46 - 50

While recovering from my cold I watched a bit of the figure skating at the Olympic Games. In between the various athletes' performances, Sunbonnet Sue appeared and skid on the ice.


Wednesday 14 February 2018

WIPW - Beads and Knots

There has been just a tiny bit of going forward on the

Crazy for Crazy

project for Work In Progress Wednesday.

I completed this before a nasty cold put a stop to further progress.
There is a pile of pink beads of various sizes,

and on top of the lace I added a number of braided knots.
These were store-bought and on the pack there was no indication of what type of knots they are.
Do you know? Are they Chinese knots, Celtic knots, Monkey Fists or Djellaba knots from Morocco? Maybe Jenni of Jacaranda knows? Or anyone else? If you have any information, I'd be happy to read your comment.

Sunday 11 February 2018

Sunday Stitch School - Closed today

There will be no new stitch today as Sunday Stitch School is closed due to illness.

Friday 9 February 2018

Friday Homework .... can't be handed in....


Student: Sorry Miss, I am in bed with a nasty cold. I won't be able to hand in my homework.
Teacher: Oh, dear. That is the result of running around crowded quilt shows!
Student: Can I show you my homework next Friday? And may I be absent from school on Sunday?
Teacher: Sure! I'll give myself a nice break from teaching. Maybe I should enjoy myself at a quilt show or something?
Student: Yes Miss, please have a nice holiday. Take care not to catch a nasty bug, though.

Wednesday 7 February 2018

WIPW - Starting the Embellishing

Work In Progress Wednesday today shows you how I have started embellishing the

Crazy for Crazy
light blue block.

I have followed suggestions in Sharon Boggon's book
 on how to place the pieces, and embellish the seams and empty areas.

I will not disclose here the 'tricks of the trade' I have learned from the book. Instead I highly recommend you get a copy. It is a good investment as the book is easy to follow and full of inspiration.
 I am glad I can use a lot of the TAST and Sunday Stitch School stitches in this project. MAYBE it will be a target - to use as many of the about 200 stitches as possible.

In the picture above I have made pink flowers out of Looped Cretan Stitch, then added Berry Stitch leaves in green with a blue centre. The blue thread was also used to whip the stem of this rambling plant.
More and different types of embellishments to come.
Till next time.