Charming and beautiful, the Ring Picot is a beautiful version of Buttonhole Stitch. Please try it!
Aida Sampler

Sunday Stitch School Reference Chart

Mottled Wool Scribble Cloth

Charming and beautiful, the Ring Picot is a beautiful version of Buttonhole Stitch. Please try it!
Aida Sampler
Here we are again, it's Wednesday and time for a Work In Progress Wednesday report.
Mandala
I added a ring of silk-covered plastic cups around the sequin waste disc. Embroidery will be the next step.


This sampler contains 299 stitches. Next week I plan to add #300 Ring Picot and it will be the last stitch.
This is what the sampler looks like right now.

I know the stitching is a bit dense in some areas and too spread out in others. To make it easier to see exactly where, I changed the photo to a black and white setting and circled the areas where more stitches will need to be added.


Hexablooms
Another set of 10 flowers now brings the total to 90.

In 2013, while I took part in TAST (Take A Stitch Tuesday), Sharon Boggon introduced us to two versions of the Buttonhole Picot. You can see her instructions here.
This link will show you the blog post I wrote about it, TAST #88
For today I want to introduce you to the Ring (Buttonhole) Picot as found on Arts&Design.
It is also featured in Mary Thomas's Dictionary of Embroidery Stitches.
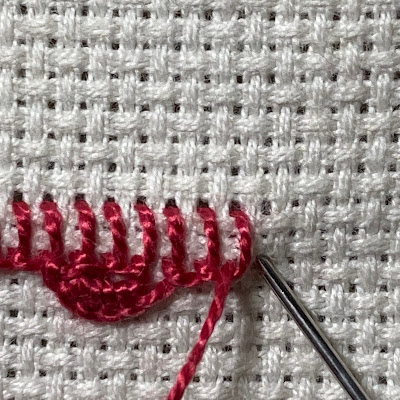
In the instructions mentioned above, the work is done right to left. I prefer to do my Buttonholes the other way around, so please note that in MY tutorial the stitch direction is left to right.
Here is my photo tutorial:

between stitches number three and four,
underneath the thread ONLY, from down to up.

without biting any fabric, I made five detached
Buttonhole Stitches from left to right.


(to have even numbers of stitches at the beginning
and end of the line).

Add here.

Well, if you look at the date, you can see that this ought to be SATURDAY homework for lesson 299. The work was completed just before midnight but I had neither time nor energy to write up the post, thus the delay. Sorry!
Aida Sampler
The grid I made was very narrow, but it looks neat and tidy.

As this fabric has no grid, I drew the crosshatch pattern and stitched on top of the lines.


