Wednesday, 26 December 2018

WIPW - Windows by Machine

Christmas turned out to be a good time to work on projects. Here is my Work In Progress Wednesday report on Boxing Day 2018.

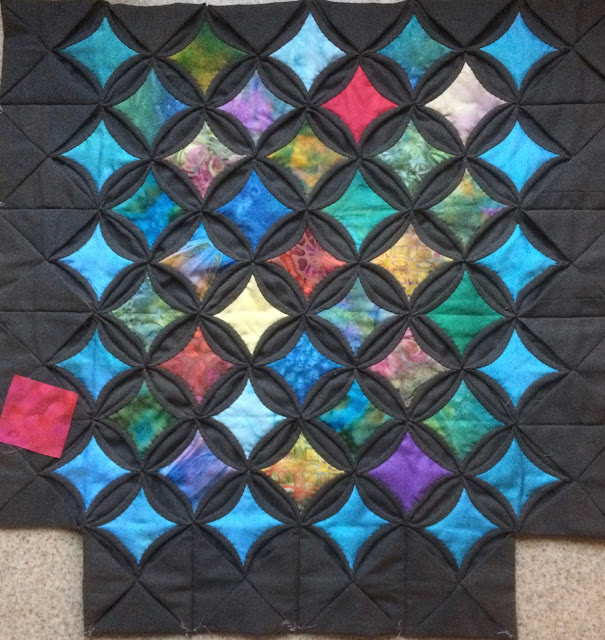
Cathedral Windows
I wanted to try a machine piecing method I had found somewhere on the internet.

First make the squares like this:

Stitch the two sides.


Pin them together

Stitch as indicated by the red line.

Turn right sides out and adjust then opening.

Press

Press the points to the centre.


All this has been shown before.
Now comes the new part:
Cut out a square that fits the iron pressed square.

Place it in the middle and give the 'envelope' a new press.

Make a few stitches in the centre to hold down the points.

Zig-zag the blocks together.

 When all blocks have been joined together you have the whole back of the bag constructed.

Next step is to insert the 'glass'.

Crazy for Crazy
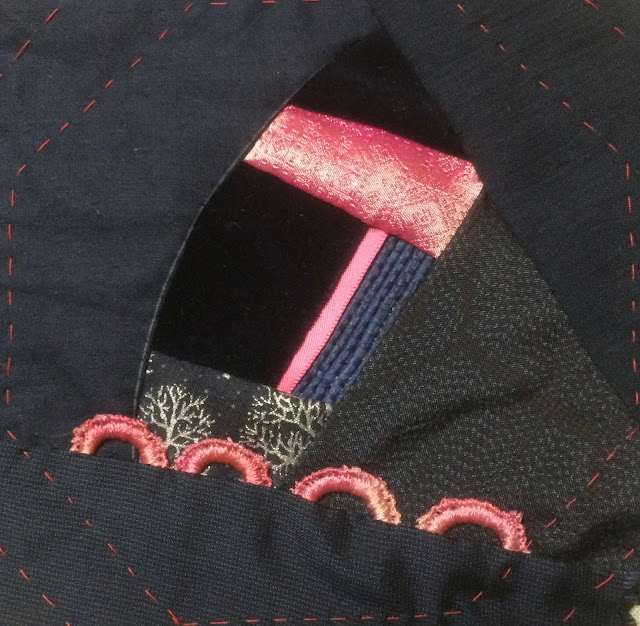
I have started embroidery on the navy/pink block.


I wish you all the very best for the few days that remain of 2018. Happy Stitching.

Thursday, 20 December 2018

Friday Homework for Lesson 84: Star Darn Stitch

The last homework for 2018:

Star Darn Stitch on
Aida Sampler

Sunday Stitch School Reference Chart


Teal Wool Tailoring Scribble Cloth

Easy, fun and beautiful!

Thank you for your support and comments during 2018.
Looking forward to seeing you in January 2019.

Wednesday, 19 December 2018

WIPW - A New Crazy Block

It is Wednesday again, and time to leave a report of Work In Progress.

Crazy for Crazy
After being so frustrated with the latest block, Sweet Potatoes and Roast Chestnuts I thought I would shelf this crazy quilt project. However, I pulled myself together and picked out a bunch of navy blue fabric, and pink threads, lace and ribbons.
I don't know if these are Aussie colours, but a lot of the thread and embellishment are from Down Under.

I then pulled myself together even more and pieced the naked block.
I must be back on track again, anyway I hope so!

Cathedral Windows
I added eleven raspberry pink pieces of 'glass' along the edge. These pieces will form the sides of the bag once it is constructed.

I am ready to start on the back, which will be done by machine.

Sunday, 16 December 2018

Sunday Stitch School - Lesson 84: Star Darn Stitch

We are now in the middle of winter and it is soon time for a break from school.

There will be no lessons for two weeks over Christmas and New Year, but before that, we have one last lesson in 2018, and as Christmas is approaching, how about a Star?

So the last stitch of the year will be Star Darn Stitch, which I found in Mary Thomas's Dictionary of Embroider Stitches.

It is a five-pointed star and is also known as Woven Star.
Updated: Mattia tells me the French name in her book of Mary Thomas's Dictionary of Embroidery Stitches is Etoile de David. A Star of David, though has SIX points, so it is very surprising.

Work it like this:

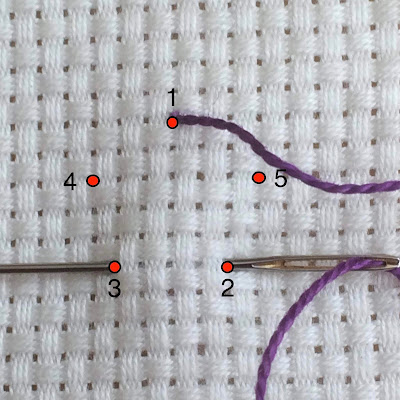
Set the five points of the star.
Come out at 1
In at 2
Out at 3

 In at 1
Out at 4

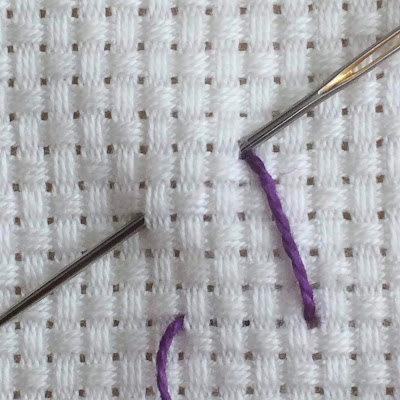
Weave the working thread over and under like the picture below

In at 5
Out at 2

Weave the thread and go in at 4
Out at 3

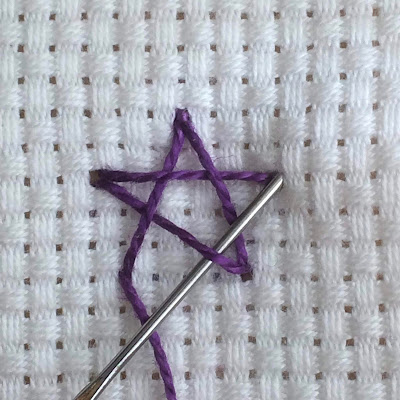
 Weave the thread and go in at 5

You now have a beautiful star.

Homework for Friday:
Sprinkle stars on these three projects.
Hand in your last homework of the year by Friday 21st December.


Thursday, 13 December 2018

Friday Homework for Lesson 83: Mennonite Tack Stitch

This stitch is easy and you will soon stitch 'fluently'.

Aida Sampler


 Sunday Stitch School Reference Chart


Teal Wool Tailoring Scribble Cloth

For this I used a lovely thread. It is a 'knitted' thread, in Japan called 'Bunka', but I got it as a gift from a friend in Australia,  and I have no idea what it is called there.
The thread is variegated and has metal fibers added. I LOVE this look!

Wednesday, 12 December 2018

WIPW - 14 x Turquoise

For my Work In Progress Wednesday this week, I can show a finish and some good progress.

Crazy for Crazy
Of the eight Crazy for Crazy cq blocks I have made, the one I call 'Sweet Potato and Roast Chestnuts' was by far the hardest and least enjoyable. The wine red fabric (sweet potato) and the grayish brown fabric (roast chestnut) did not offer any contrast. The brown and beige thread I started out with disappeared on the fabric. The emerald-ish teal thread looked too stark... Whatever I did felt disappointing.
Before giving up I had to do something. Finally I decided to add a few sequins and whip the Portuguese Stem Stitch with some light teal thread.


I will now call it quits and start with a new block that hopefully will be more enjoyable.


Cathedral Windows
I added 14 turquoise pieces of 'glass'. These will be on the edge/corner of the bag.
Furthermore I cut out thirteen raspberry pink pieces of marbled fabric and patterned batik, and these will be added to the empty squares. Once the bag is fully assembled these will be on the sides and the bottom of the bag.
When that is done, I can start on the back of the bag. I will make those squares and insets by machine, to try out another method.


Sunday, 9 December 2018

Sunday Stitch School - Lesson 83: Mennonite Tack Stitch

There are so many things happening in December as the year comes to a close. So let's have an easy stitch this Sunday here at Sunday Stitch School.

Let's take a stitch out of Elizabeth Healey's excellent book Stitch, Fabric & Thread  -  the Mennonite Stitch.
This stitch is often used in Utility Quilting, i.e. a simple and fast way of keeping the three layers of a quilt, top, back and wadding together by stitching individual stitches on the surface and letting the thread travel inside the wadding to the next stitch.
It is a 'rough' form of quilting, but the Mennonite Tack Stitch can be used for embroidery, too.

This is how to work it:


Homework:
Add Mennonite Tacks to these three pieces.

Friday, 7 December 2018

Friday Homework for Lesson 82: Bokhara Couching

I finished my homework in the nick of time.

It was fun and easy to stitch, but I had to rush so the result is not as neat as I would have liked.

Aida Sampler
The large space between the holes makes Aida unsuitable for filling, but it was very easy to stitch and I quite like the grid-like look.

Sunday Stitch School Reference Chart
 It was enjoyable to work free form.
On the brown and light blue rectangle I cheated of course, and used brown thread for the laid work and light blue for the couching. Also I did not pay attention to where I placed the stitches so I got a very modern free design there.

 Teal Wool Tailoring Scribble Cloth
For this pentagon design I used an old template. I added five long Straight stitches to define the shape.

Wednesday, 5 December 2018

WIPW - Bottom and Sides

For Work In Progress Wednesday this time there is little to report.

Cathedral Windows
I have stitched on the bottom and the sides (well, a bit is still to do) by hand. That's all I have had time for.
No 'glass' inserts yet.

Sunday, 2 December 2018

Sunday Stitch School - Lesson 82: Bokhara Couching

Once again Sunday Stitch School is focusing on couching, this time on the Bokhara Couching Stitch.
For this stitch we are not couching one thread in a single line for an outline, but filling in an area, e.g. a leaf.
The finished look has some similarity to the Bayeux Stitch, but you fill in the background at the same time as you do the Couch-As-You-Go stitch.


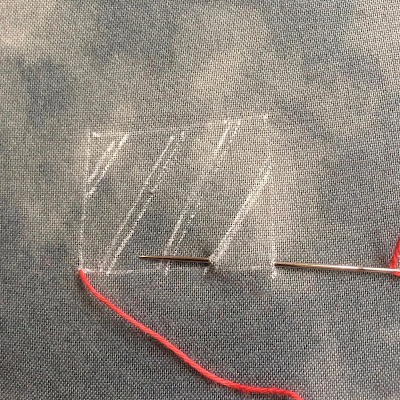
Draw the outline of the shape you want to fill, and some slanted lines inside.
I made parallel lines to guide the needle.

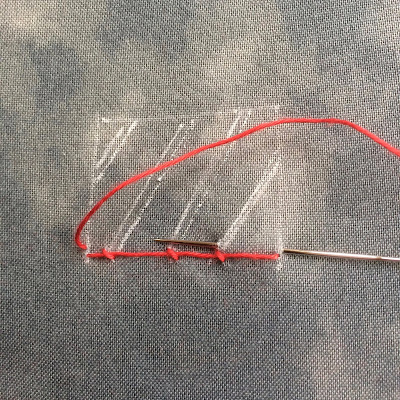
Come out at the bottom left corner, place the thread across the bottom of the shape to the right corner.
Come out on the left of the first parallel line, slightly above the laid thread.

Now take a Back Stitch over the laid thread and go in slightly below to the right so you have a slanted stitch.
Repeat with the next, and so on,

and work your way up
I will need to practice to get a tidier result...


Homework:
I wonder how this will look on Aida! Try it out on the Aida Sampler.
The Sunday Stitch School Reference Chart and the Teal Wool Tailoring Scribble Cloth should be less of a challenge.

Friday, 30 November 2018

Friday Homework for Lesson 81: Revered Fly Stitch

Fun, easy and fast.

Sunday Stitch School Reference Chart

Aida Sampler

Teal Wool Tailoring Scribble Cloth

I especially enjoyed working them free form with a variety of threads and sizes.
On Aida or counted linen they can take on a very geometric look, which is also good.
So it is a very flexible stitch.

Wednesday, 28 November 2018

WIPW - Busy, busy

I have been busy and can report on the following for Work In Progress Wednesday.

Greeting Cards
I have made two cards,
a Condolence card
Stitches used: Loopy Flower, Crown Stitch with  Lazy Daisy, God's Eye with French Knots and Corded Bar.

The other is a Thank You card and is the stumpwork portrait I showed a glimpse of before
Her hair is made of Chain Stitch, and the fringe of Straight Stitch.
I used Twisted Fly Stitch as a filling stitch for her blouse, and edged it with Twisted Shell Chain Stitch.


Experiments With Beads

The Queen of Beading, Angela, of Princess Bubbles Creates made some Funky Beaded French Knots, and I just had to try adding beads to some knot stitches.

First I placed the knot beside the bead

Then I placed the knot on top

I added a bead to the start of a Bullion Knot


It was fun to play with beads! Maybe I should add some beaded version to the Sunday Stitch School stitches...
Thank you Angela för the inspiration!

Crazy for Crazy

The Sweet Potato and Roast Chestnut block was put in a box and left to slumber while I think about what to do next.
No progress whatsoever.


Cathedral Window

I spent a lot of attention on this project. It was quick work, though, as I stitched by machine. 

 I cut 34 squares.

 I folded them in half.


 I stitched both short sides.


 I opened up, and paired up the sewn seams.


 I pinned, and stitched.

I left an opening, and turned each piece right side out.

 I turned in the raw edges of the opening.

I pressed.
 I folded each corner to the centre and pressed.

I fixed the four tips to the centre with a few stitches.


In total I prepared 34 blocks. It was so much quicker by machine, than when I made the first twenty blocks by hand.

Now I am ready to add 'glass' inserts to the sides of the bag, and I will do that by hand.
Then I will add glass to the back of the bag using another method, and take help of the sewing machine.

I hope to have more progress next week.