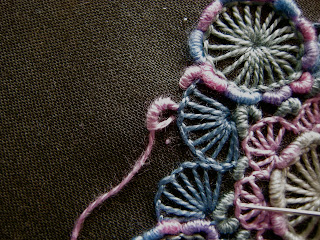
Life threw a lot of obstacles in my way this week and I am sorry to post my efforts late. I wanted to make something like lace or tatting and ended up with this:
I strongly recommend you to click on the links in the Comments field on Sharon's blog to enjoy what other TAST participants have made.
One of them, Isabelle of pierrespapierscuseaux, asked for advice about how to deal with the tricky Bullion Knots. I don't know if this is of any help, Isabelle, but here is how I go about it:
1) First I make sure I am using a needle of even width, a so called Sharp or Milliner's, like the one on the left.
The needle on the right has an eye that is wider than the shaft and that makes it difficult to pull the thread through, so avoid that kind of needle.
2) I insert the needle a small distance away from where the thread came out.
3) I am using an S-twisted thread, and wind the thread clockwise around the needle.
4) To make it easier to wind the thread I lift the needle off the fabric with a finger.
5) When I have wrapped the thread enough times around the needle I hold the wraps tightly while pulling the needle through.
The needle ususally slides through easily, but should it be hard, I then twist and turn the needle slightly to ease its way through.
6) Once the thread has been pulled through I am sometimes left with a bit uneven 'leg'.
7) I insert the needle in the hole of the 'leg' and pull the thread to the back of the fabric.
9) That help comes in the form of a pin, or a crochet hook. While stretching the Bullion Knot outwards I pull the thread underneath.
10) The 'leg' slips inside the wraps and evens out the Bullion Knot.
To read more about needles, S- and Z-twist and the Bullion Knot, and a good instruction for how to make the Buttonhole Eyelet Flower, I can recommend 'A-Z of Embroidery Stitches 2'.


24 comments:
oh Queenie I think this is one of your best it is beautifully stitched and love the colours and design. Your instructions are very well done, you`ve put me to shame have not done my sample cannot get motivated at the moment.
Oh, Margaret, I am sorry to hear that. If I could, I'd send you an armful of motivation and inspiration. If you made just one Buttonhole Eyelet Flower on a circle of felt, you'd have a small ornament for the tree.
Actually I, too, almost thought of dropping out; all week obstacles were thrown at me, but in the end I found a slot of time to work this week's stitch.
All the best,
Queenie
I feel so honoured by your comments on my blog. Receiving such heart-warming words from a very special person like you makes me happy. Thank you!
Again you have perfectly realised one of your innovative ideas. I love your colours and and the lacy look of your work.
Thank you for taking time and write about your making bullion knots. I'm sure it will help a lot.
Hopefully your next week will be without any obstacles!
Waving from sunny island Claudia
Thank you, Claudia
YOUR words are pepping ME up!
December is such a busy month I am sure next week will be hectic as well. Better plan to make a small TAST item, ha, ha!
Your buttonhole eyelet doily looks amazing! Colours used and perfect stitching makes it beautiful. Thank you for the tutorial.Unfortunately this week was hectic for me aswell hence I havent been able to post mine :( . Will do next week with TAST week 50.
Thank you for your kind words, Latha.
There are so many extra jobs at the end of the year I don't really know how ANYONE can devote much time to embroidery, unless it's you job of course.
Looking forward to your double week work next time.
Your design is just gorgeous! It really looks like tatting, great job! I think we all need a few extra hours in this time of the year.
Very nice design and beautifully stitched!
This is so beautiful and it looks like lace doily, especially the thumbnail!
Your blog is really something I like to wander around.
Brigitte
Gorgeous.... I love your embroidery
Thank you. Yes, I will have to put a time limit on tomorrow's stitch!
Thanks, Marjolein!
Thank you for your kind words. I think we have a lot in common; I love your embroidered portraits.
Thank you. I get such a lot of inspiration from you and all the other participants of TAST. Sometimes I feel like a thief, when I see something and try to use it in my own work (but with a personal twist).
Lovely work..and the step by step instructions are so wonderful.It is a delight to visit your blog.
Thank you Mahalaksmi,
We all work in different ways and it is good to share any trick or smart method. I have learned so much from others and am happy if my 'tutorial' has been of any help.
your work is a joy to see and the instructions very clear and helpful.Thank you Tricia
Your work is really wonderful, I love the design and the colors
Thank you for your kind words Tricia. Have a go! Make something with the Buttonhole Eyelet Flower.
And I love YOUR work. The floral display was so sweet and I am happy you made Shaon's highlights. Congratulations!
This is a superb sample and your instructions are great.
Thank you, I value praise from such a skillful artist like you.
Oh Carin this is beautiful. Your choice of colours and threads set of the design perfectly.
Thank you, I value your comment so much.
Post a Comment