Showing posts sorted by relevance for query Bamboo. Sort by date Show all posts

Friday, 24 October 2025

Friday Homework for Lesson 341: Bamboo Stitch

 If you want to save thread, you can place the stitches 'á la Surface Stitch'. This way, the back will be thin, smooth and tangle-free.

Stitch it according to the instructions I posted last Sunday, and you will get a sturdy piece, suitable for upholstery. The disadvantage, though, is that you have to use a lot of thread.


Aida Sampler


The Bamboo Stitch looks good in green - its natural colour.


Sunday Stitch School Reference Chart

Here I used three colours.


Red Kimono Silk Stitch Sampler

Here we have old, mature bamboo in a pale beige. Doesn't it look like a fence in a Japanese garden?


Sunday, 19 October 2025

Sunday Stitch School - Lesson 341: Bamboo Stitch

Bamboo Stitch is the name of a needlepoint stitch I found at Unwind Studio, where there is both a graph and a video for you to watch.

Or follow my photo tutorial:

Use 7 holes to make two long vertical stitches.


3 holes for two short vertical stitches.

Repeat to the end of the line and then work
your way back, making one horizontal stitch
over each set of two shorter stitches, above and below.


Make horizontal stitches for the longer stitches, too.
Fill the rest of the canvas/Aida in the same way.


Homework:
Fill here.


Sunday, 30 November 2025

Sunday Stitch School - Revision: Stitches 341 - 345

 It's time to look back at the last five stitches:


341 Bamboo Stitch

This is a nice filling stitch. If you look closely, it does look like the stems of bamboo grass.


342 Broken Chain Stitch

Fish hooks? Dangling earrings?

It's an easy stitch and can be used as a base for other stitches like French Knots or Straight Stitch.


343 Open Fishbone Stitch

Here is the perfect stitch for portraying leaves. It looks very nice in a variegated thread.


344 Persian Star Filling Stitch

Tension is important here, but the result is very pleasing, don't you agree?


345 Barred Buttonhole Wheel Stitch

I love this variation of the traditional Wheel Stitch. If you packed more of the Buttonhole Stitch in each quarter, you would end up with a cross in the middle!


Homework:

Let Sunbonnet Sue illustrate these five stitches, somehow.


Wednesday, 19 June 2013

WIPW - Flowers

Work
In
Progress
Wednesday

Regular readers know by now that WIPW for me means a report on my Kafferepet quilt.
We've come to the last kind of items on the quilt - flowers.

For the well dressed coffee party table there must be flowers. Winters in Sweden are long, dark and cold so almost every home has a selection of potted houseplants, many of them flowering. A pot with hyacinths, African violets or orchids may decorate the table.

However, cut flowers are more common, especially in the warmer seasons. They may be shop bought, or picked in the garden. Usually they are beautifully arranged in a vase, but they can simply be strewn on the table as well.

One of the most popular summer flowers is the Ox Eyed Daisy, and it is even featured on the Swedish National costume.

I come from a long line of florists, and gardeners, who cultivated new varieties of fruit and flowers. Having flowers around the house is second nature to me, and for this quilt I tried to follow in my ancestors' footsteps and bred a new 'Heart Petalled Daisy', i.e. I appliquéd a couple of fantasy flowers, ha, ha!


Flowers on the table can of course also be the edible variety. There might be crystallised violets on a cake. How about some rose jelly as a cake filling, lavender scones, lemon scented pelargonium leaves in the muffin batter, camomile tea or small frozen flowers in the ice cubes...

-.-.-.-.-.
Japan is famous for its Ikebana. You can see these artistically arranged flowers in the alcove of a traditional living room,


in restaurants and even railway stations or post offices.
However, these arrangements are not placed on a dining table. Even other bouquets of flowers are displayed on side tables, in the window or at the Buddhist altar (in this last case they are a special selection of flowers), but NOT on the table. Now here comes a contradiction: That doesn't mean that there are no flowers on the table! There are, but they are for consumption; cherry blossoms cured in salt and used for tea, chrysanthemum  petals pickled in vinegar and honey, rice steamed in bamboo leaves... Also like kitchen wizards in many other countries, a Japanese chef might carve vegetables to look like flowers, e.g a slice of carrot turned into a plum blossom.
Oh, and of course, in spring the chops sticks might rest on a small twig with cherry blossoms and in autumn there might be a red maple leaf in the bamboo basket of deep fried vegetables - not for consumption, and not in the common home, you need to go to a 'fancy' restaurant to see this.

-.-.-.-.-.
More progress on the border.
I used Sharon's CQ Stencils for the swirly TAST stems. #56 Sailor Stitch on the left and #12 Barred and Alternating Barred Chain Stitch on the right
Some stitch treatment on flower and leaves. There will be beads added later.
For more WIPW reports, visit Pintangle.

Saturday, 16 September 2017

Friday Revision Homework - Stitches 31 - 35

Sorry to be one day late in presenting my homework. My excuse is that 'life got in the way' and just before midnight, I was simply too tired to do the blog post.

---------------

Four of the five Sunday School Stitches used this time have Chinese or Japanese in their names.
That is why my Sunbonnet Sue is on a field trip to Asia, to Japan, to be exact.

Like so many tourists these days she has rented a kimono and is tottering along in her wooden 'geta' sandals, keeping the sun out with her waxed paper umbrella, or is it raining,  and swinging a bamboo basket bag.


First I made the sketch and planned where to use the various stitches.

Then I used a rubber molding mat and a blue fabric crayon to make a subtle pattern on the kimono.
The waxy crayon was easily set with a hot iron, and did not smear anything while I stitched the details.

This is how I used the stitches:


Wednesday, 13 March 2019

WIPW - Back On Track

THANK YOU for all well wishes and kind comments while I was poorly. I took time out from most things, slept a lot, and apologize for not having visited your blogs or left comments.

I am now well again and back on track.

Work In Progress Wednesday report

Greeting Card
or should I say Stumpwork Portrait.
Do you remember this out of focus picture, a teaser?
It is a Stumpwork portrait I made before I got ill, but could not write about it as it had not reached its destination. 

Now it has, so I can show you:

The hair was made this way:
Wind six strands of embroidery floss tightly around a bamboo skewer.

 Spritz with water and
 press with a hot iron.
 Unravel the curls and
stitch them around the head.

Twisted Perle forms the hair ornament, metallic thread the eyeshadow, a scrap of light blue accordion ribbon makes up the blouse, a ragged (cut roughly with pinking shares) piece of salmon pink nylon folds into a jacket and is held together with an odd necklace clasp.

For this portrait I also added ears and I will show how that is done on another blog post.

Crazy for Crazy
I filled in the leaves with Cretan Stitch and added a beautiful tatted flower I had been given from the owner of the portrait above.


Brazilian Embroidery
I managed to read through the booklet, made notes of some interesting points, but have not started stitching anything yet.


Wednesday, 13 April 2016

WIPW - A Giant Step

For this week's Work In Progress Wednesday post I think I have taken a giant step forward.

Kjolsäck
Inserting the bag's body and lining into the groove of the purse frame was not as difficult as I had thought. The piece of white plastic (see last week's post) I started out using was helpful, but a dining knife was even better.
After fixing the fabric to the metal with black thread I added a row of decorative aqua Cross stitches.
The frame is held in place firmly.

Next I made the 'kavelfrans' or napped edging. I have made this 'wooly worm' differently in the past,  this time I wanted to speed things up by using the sewing machine.
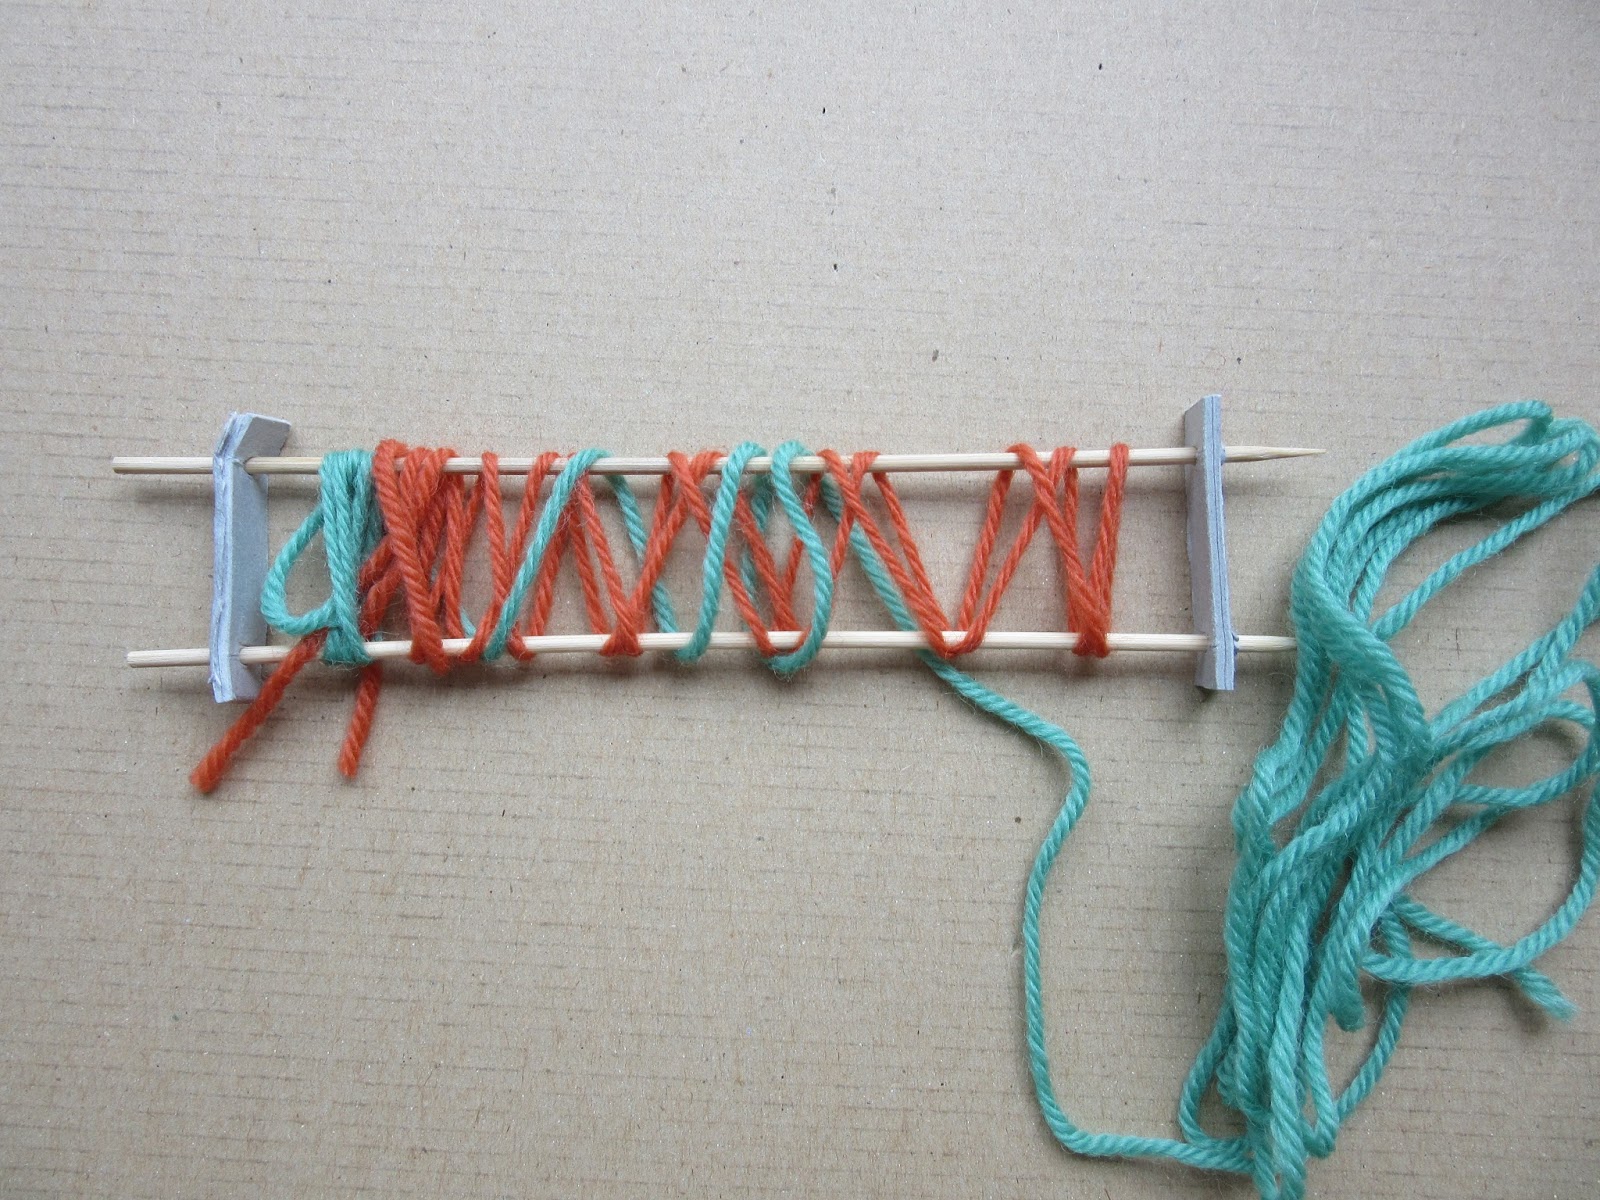
First I made holes in two pieces of stiff cardboard, inserted two bamboo skewers and wrapped them with wool.
I placed the 'ladder' on top of a bias tape and slid it under the presser foot of the sewing machine,

stitched down the middle until I had a loopy worm.
Each loop was cut open.
With a comb and brush, I separated the strands of wool, then held the napped edging over the steaming spout of a boiling kettle, until the fibres had felted together.

It was then time to stitch the sides and bottom of the bag together with the edging in between.
Construction was easier and quicker than I had thought, and I am rather pleased with the result.

Next step will be to make a cord with the 'slynggaffel', or lucet in English. This black yarn is a bit too fine, I might have to make the cord in a different colour...