I learned the Arrowhead Stitch a long time ago, in 2012, when I took part in the TAST (Take A Stitch Tuesday) stitch tutorial and challenge hosted by Sharon Boggon of Pintangle.
Arrowhead Stitch can be either a linear stitch or a set of stacked individual stitches, like the ones I made in 2012 on the TAST Reference Chart, below.

In 2020, Sharon published a great book, Creative Stitches for Contemporary Embroidery, where several of the most basic hand embroidery stitches have been given a 'twist' or variation.
It was in this excellent book that I found Laced Arrowhead Stitch. There are two versions, we'll learn the simpler one today and leave the more complex one for a later lesson.
While doing research on the web, I found other alterations too, so there will be more stitch fun in the future here at Sunday Stitch School!
Anyway, today let's start with the foundation, the Arrowhead Stitch and then learn how to lace it:
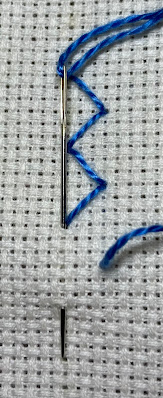
Make a horizontal line of Arrowhead Stitch.


Now for the lacing, come out at the foot of the first stitch and take the needle upwards under the stitch without biting the fabric.

Go downwards under the second stitch and continue in the same way.

When you reach the end, anchor.

Here I used Perle 8 in both the foundation and laced stitches.

Using tapestry wool, silk ribbon, metallic or other chunky threads works perfectly as the thread only goes through the fabric at the start and end.

Homework:
Homework:
Add to these samplers

4 comments:
It looks great with the thicker wool! Definitely putting this one in my July slice.
This one is nice and even on the aida fabric. Very pretty!
Yes, a good basis for variation, this one!
It is certainly effective to change the thickness of the two threads.
Post a Comment