This is an easy and enjoyable stitch!
Sorry for the poor photo quality.
Aida Sampler

Sunday Stitch School Reference Chart

Mottled Wool Scribble Cloth

This is an easy and enjoyable stitch!
Sorry for the poor photo quality.
Aida Sampler
Many years ago some friends in Norfolk, UK, introduced me to the Green Man. This architectural feature can be found in many churches in East Anglia, although it is not unique to the UK.
There are various thoughts about what the Green Man actually symbolises. Many believe it to be a symbol of rebirth and the ever-changing seasons. Others speculate that the village craftsmen who helped build the churches wanted to add their own 'stamp' or even a bit of pagan mischief, especially as these Green Men are often well hidden. e.g. under pews and high up in the ceiling.
Read more about the Green Man on Wikipedia.
My friends and I would go on excursions and visit small village churches to look for Green Men in the masonry, wood carvings and roof bosses.
Some faces are grotesque, others charming. The most well-known and best-loved, and in my opinion, the most beautiful, is the roof boss in Norwich Cathedral Cloisters. In fact, it is so adored it has lent its features to postcards, posters and cross-stitch kits. I made this one MANY years ago.


Today I will start telling the stories of these blocks with the Cross-Stitch block:
I used the chart from the kit above, and DMC stranded floss left over from other projects. It is probably the block that required the most time to make.

This is the first Work In Progress Wednesday report for August 2023.
Some of this work was done on World Embroidery Day 30th July.
Mandala
It is time to work on the 'lolly-pop stick'. The three circles of 'candy' need some kind of extension. I, therefore, drew a wide oval line which I outlined with a parallel Running Stitch using a metallic Bunka thread from Oliver Twist.


Sunday Stitch School Stitch Sampler
Similar to #145 Roll Chain Stitch is Madam Totsuka's #28 Half Bullion Chain, so a few lines of the latter (in pink) were added nearby the former (variegated pink/red). Both stitches can be seen in the last picture, below.


Today's lesson falls on World Embroidery Day! So why not join me and the rest of the embroidery community and stitch something?
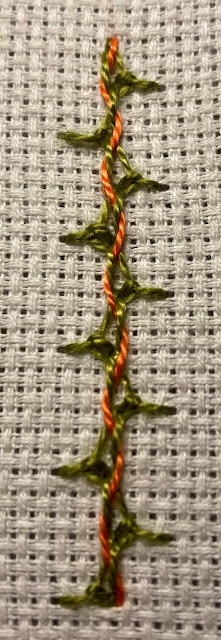
I have the perfect stitch for you, especially if you remember stitch number 254? Alternating Mountmellick Stitch?
In that blog post, I mentioned that Mary Corbet of Needle 'n Thread in her series of Stitch Fun had tweaked the Mountmellick Stitch into a laced version.
Today we are lacing the Alternating Mountmellick Stitch that way.
Go to Needle 'n Thread for a really clear tutorial.
Or make do with my photo instructions:
Start by making a line of Alternating Mountmellick Stitch.


under the first Chain Stitch's left side.

under the second Chain Stitch's right side.
Make sure you don't bite any of the fabric.


like metallic,


These samplers scream for Lacing!


