Today we are looking at a stitch used by many of the women settlers who travelled West into unknown areas of North America.
The pioneers had with them very limited supplies. Worn clothing was cut apart to make patchwork quilts. It was harder to find thread. Sometimes fabric was painstakingly taken apart and separated into threads. Naturally this 'thread' was not very strong.
However, 'thread' could be found amongst the supplies needed for the annual chore of candle making. The 'wax' used was either tallow, fat from animals collected at slaughter, or sheets of beeswax. The core of the candle, the wick, is a four stranded thread.
The colonial women found that wick made excellent thread for embroidery and quilting. The four strands could be separated and thereby supply the women with enough thread for various quilting or needlework projects.
Sheets, pillow cases and bedspreads in white cotton were decorated with embroidery in Stem and Outline Stitch, Padded Satin Stitch and French Knots.
A new form of knot was created, as it supposedly requires less thread, the Colonial Knot.
Together these stitches form the embroidery style Candlewicking.
Here are some links to interesting reading about candle making and candlewicking.
Today's stitch is the Colonial Knot, also known as Figure 8 Knot.
French name: point de nœud colonial
Work it like this:
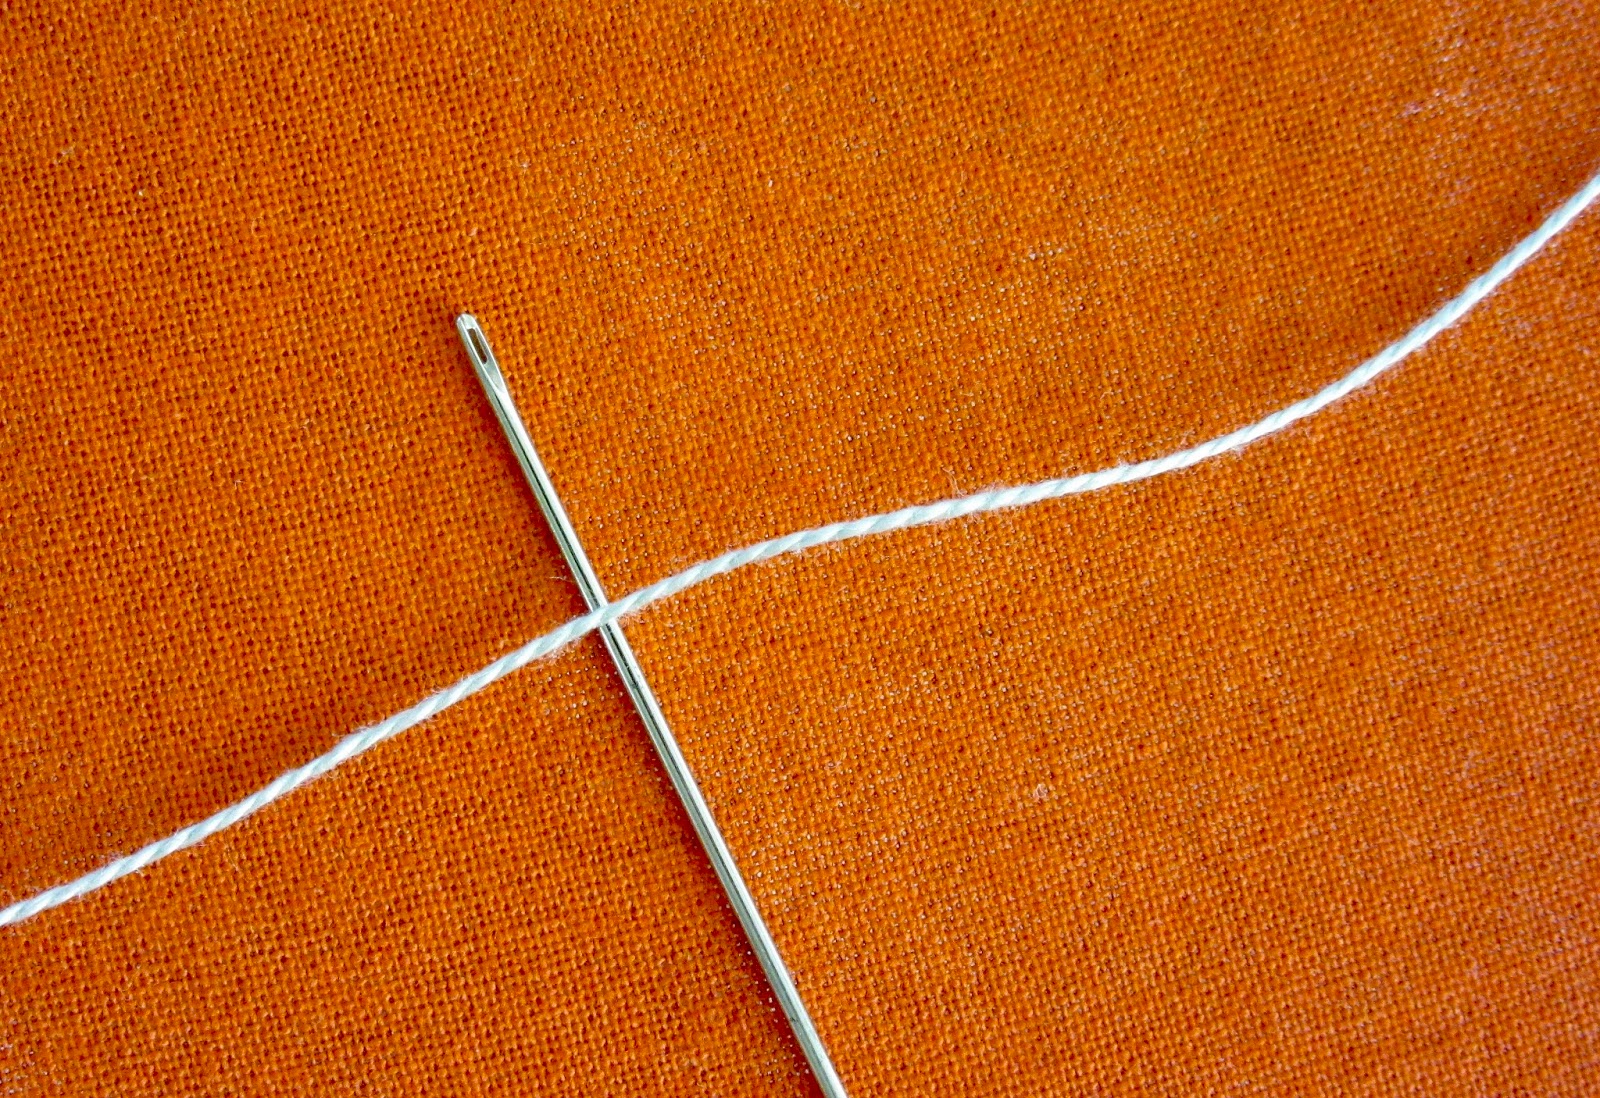
Get out a Milliners needle and a thread with a firm twist, here I used perle #8.
Tighten the tension.

Place the working thread over the needle like in the picture.

Cross the thread over

and under the needle.

Insert the needle close to where it came out.

Tighten the knot and pull the needle through the fabric

Make dotted patterns with the knots.
Here is a line on my Aida sampler
Homework:
1) Add a sprinkling of Colonial Knots

2) Dig out previous work and show on Friday.
Interesting history lesson! I prefer the colonial knot to the French knot.
ReplyDeleteI, too, like the Colonial Knot better than the French one, but I actually use both.
DeleteIt's a very pretty knot, isn't it!
ReplyDeleteYES, it is. It (usually) leaves a nice little empty cup in the middle, perfect for adding another knot and thereby creating an eye on a stump work portrait, for example.
DeleteInteresting lesson. I shall have to try this knot to see if I prefer it to the French knot.
ReplyDeleteDo give it a try!
DeleteThere are usually two camps, those who prefer FK and those who favor CK.
Two interesting Candlewicking reads. I also use both FKs and Colonial knot but prefer the latter as it sits more firmly for me.
ReplyDeleteI have the same experience, but think it is because I stretch the fabric tighter if I know I will be making Colonial Knots.
DeleteTwo interesting histories. I also use both FKs and colonial knots but prefer the latter as it sits more firmly for me. A quick, easy stitch that is fun to play with.
ReplyDeleteYes, once you have got the hang of the movement, it is quick and easy work.
DeleteNice tidy little knot, like the figure 8 knot on a line.
ReplyDeleteYes, it is actually quite pretty to look at before you tighten the knot!
DeleteI prefer the Colonial knot, my French knots are all different and look untidy.
ReplyDeleteI agree that the thread seems to have a firmer grip around the needle when you make a Colonial Knot and therefore is easier to get equal tension.
DeleteI like both colonial and french knots, but I find french knots more flexible in terms of changing the size with the number of wraps.
ReplyDeleteThank you for pointing this out. Yes, of course you can add more wraps than you can on a Colonial Knot!
DeleteI'm sure the colonial knots will look nice on your sampler. From time to time I switch from French to colonial knots.
ReplyDeleteTo me, which stitch I use depend on if the fabric is in a hoop or not. The Colonial knot is almost impossible to make without the fabric stretched tight in a frame or hoop. The French Knot can be worked freehand, although with some difficulty.
DeleteWhat a great history lesson! I loved the examples of candlewicking. When they were younger, our boys were able to make candles at the local museum, while learning about what it was like for the pioneers that traveled to Oregon. Thanks for the links!
ReplyDeleteI, too, made candles when I was a child, together with granny.
DeleteThis comment has been removed by the author.
Deletethanks for this post, I didn't know where the term candlewicking came from. It's something I want to try at some point. I also had no idea of the difference between a french knot and a colonial knot - though I can't see any difference in the final product!
ReplyDeleteYou can read here what Mary Corbet says about them.
Deletehttps://www.needlenthread.com/2012/06/the-french-knot-vs-the-colonial-knot.html
Thanks for the history on colonial knot.
ReplyDeleteAnd that is an excellent tutorial, great detail.
Colonial knot is a beautiful design unit.
Usually we like one of the other. For me, my heart beats for the Colonial Knot.
Delete