Pages

Friday, 31 March 2017

Friday Homework for Lesson 16: Puncetto Valsesiano Stitch

Teacher:   It's Friday, so hand in your homework!
Student:   Yes, Miss.
Teacher:   Hm, what's this then?
Student:   Hm, I don't know. It's supposed to be Puncetto Valsesiano Stitch.
Teacher:   Hm. Remind me, what was the set homework?
Student:   Pay attention to the tension, the twist and leave enough room in each knot to insert the needle on the return journey.
Stitch something high and lacy, 
and in the style of free form, 
and on plain cloth.
Teacher:   Well, have you paid attention to the tension and the twist?
Student:    Well, Miss, I have tried to. I certainly rolled the needle and sometimes let the needle and thread dangle to untwist itself, just as I was taught in the lesson.
Teacher:    Did you leave enough room in each knot to insert the needle?
Student:    Well, Miss. I tried to, and I hope you don't mind me saying this, but I think your instruction was wrong.
Teacher:    My instruction was WRONG???!!!
Students:  Yes, I am sure you meant 'leave enough room BETWEEN the knots'
Teacher:    Oh! So that is how you explain the unevenness of these stitches?
Student:    It WAS difficult to see where to insert the needle. It might also be due to poor lighting and my poor eyesight.
Teacher:   Hm, so in your opinion this stitch needs a good source of light and a magnifying glass.
Student:    ... or a microscope.
Teacher:   What's that? Speak up!
Students:  Well, it WAS difficult to see.
Teacher:    OK. Now did you stitch something high and lacy?
Student:    I stitched some areas high, like this white 'object'. I did not stitch any lace, but I made some holes, and look on the right, this is almost a face.

Teacher:   Hm. Well, I can see that you have stitched on plain fabric and in the style of free form.
Student:   This stitch reminds me of stump work and I think it could be used for a knitted stumpwork sweater, a muffler, even a funky hairstyle or a disastrous perm....
Teacher:   Hm, I'd say you need much more practice before you have mastered needle lace making. However, these 'objects' would make an interesting piece of modern free form embroidery or indeed a stump work portrait, and as the stitch was to be used as a 3D embroidery stitch, I'll accept it.
Student:   So I don't have to do my homework again?
Teacher:  No, you don't need to, but should you find the time, I'd be happy to see you use this stitch again in a creative way.

Wednesday, 29 March 2017

WIPW - Tagliatelle con Spinaci

Work In Progress Wednesday for this week is about cooking!

For the
Trinity Green
quilt I have been making Tagliatelle con Spinach, or spinach tagliatelle pasta.
'Rolling out' the dough with a hot iron, and cutting the 'fresh' pasta with a 'pizza' rotary cutter.

No, that is a joke! I have been pressing green cotton fabric, and with rotary cutter and ruler cut long strips. What you can not see in the picture, because I have no photo of it yet, are the small pieces of gold fabric I have been added to the joints of this long 'ribbon'.

Next step is to stitch this to the 'snakes' with green triangles.

Sunday, 26 March 2017

Sunday Stitch School - Lesson 16: Puncetto Valsesiano Stitch

Welcome to another lesson at Sunday Stitch School. What's on offer today? Well, I thought it was time to play with a needle lacing stitch.

Only a needle and some thread is needed to make the decorative Puncetto Valsesiano needle lace from the Valsesia region in Northern Italy. Most commonly it is worked in white, but the Mastallone Valley folk costumes are often decorated with coloured PV needle lace.

Interested to know more? Read this article by Google Arts & Culture.

Instead of making a lace doily, snow flake square or parts of a folk costume, I want to use the Puncetto Valsesiano Stitch as a 3D embroidery stitch.

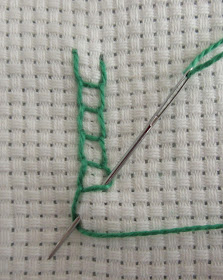
Work it like this:
 First fold the fabric you are working on and stitch right on the fold.

First work from left to right.


To make an open space skip a few stitches while leaving a loop of thread.

When it is time to work the second row don't turn the work over, instead stitch from right to left. Go between the knots, not catching any of the fabric this time.


Work new knots on the loops on the return journey.

Work the third row left to right by inserting the needle between the knots.


A note on the twist of the thread. In the examples above I have used perle 8 which has an S twist. (Read more about S and Z twists at Needle 'n Thread.)

When you stitch from left to right with an S-twisted thread, the thread twists itself a bit tighter. When you stitch from right to left (on the return journey) the thread untwists itself. 
In both cases, you need to either let the needle and thread dangle for a short time to regain the right twist, 

or 
you need to learn to roll the needle between your thumb and index finger in a clockwise and anti clockwise direction.
Anti clockwise for left to right stitches.

Clockwise on the return journey.

It IS confusing! With practice you can control the twist 'automatically'.


Homework:
Pay attention to the tension, the twist and leave enough room in each knot to insert the needle on the return journey.
Stitch something high and lacy, 
and in the style of free form, 
and on plain cloth.

Friday, 24 March 2017

Friday Revision Homework - Stitches 11 - 15

The set homework for revision of the Sunday Stitch School's stitches 11-15 was to use them on a Sunbonnet Sue design.

Once upon a time Sue was a baby girl and it was the hood of her pram that was the Bonnet that kept her face out of the Sun.

11 - Knotted Satin Stitch was used for the quilt and the ties on the kite string.
12 - Lace Stitches make up the hood of the pram.
13 - Mountmellick Stitch was used for a lace edge along the hood and the top of the carriage, as well as the frill on Sue's sleeves.
14 - Norwich Stitch in variegated floss was used for the kite.
15 - Open Chain Stitch in pink for the carriage, and bundled in the blue tyres.

For the kite string and sleeves I used Stem Stitch.
Straight Stitch was used for the hands, the outline of the quilt blocks and the spokes of the tyres.


Thursday, 23 March 2017

TAST Interview


Sharon B of Pintangle is running a series of interviews with TAST followers. This is a fantastic way to read more about how fellow followers take to 'needle 'n thread', what makes them 'tick' and learn from their wisdom.


I would like to thank Sharon for helping us to learn from each other and share our joy of needlework.


Today my interview was posted. Read it here.


Previous interviews:
Annet of FatQuarter.
Renee of Hand Stitched Treasures
Angela of Princess Bubbles Creates
Maureen of CrazyQstitcher


The cherries are beginning to open their buds and I have hung up my seasonal crazy quilt.


Wednesday, 22 March 2017

WIPW - 9,234

Work In Progress Wednesday can this week report on real progress.

Trinity Green

It has been a productive week; I made 18 new paper strips of 486 triangles.

This means that I have completed the first step in making this green bed size quilt - I added the very last triangle!

The final total came to 9.234 triangles.


Next on the menu is stitching strips of thin green 'sashing' between the rows of triangles and then ripping out the paper until I have a flimsy.

The upcoming week will be very 'green',

but around me in Tokyo it is very 'pink'.


Tuesday, 21 March 2017

TAST 143 - Fancy Herringbone Stitch

TAST stands for Take A Stitch Tuesday, and how to Take A Stitch on a Tuesday is taught by Sharon B over at Pintangle.

Click here for the tutorial of Fancy Herringbone Stitch, which I will add as number 143 in my collection.

TAST 143 Fancy Herringbone Stitch is made up of three parts, a base of Herringbone Stitches (pink) is held held down with small Upright Cross Stitches (red) and then laced in a fancy way (light blue ).

It wasn't difficult, but with all laced stitches, tension is tricky, and my result looks sloppy.

I also worked a set of stitches on my TAST Reference Chart. Later I will add the label with number and name.
Here the tension is a bit better, so there is hope for further improvement in the future! I hope!

Sunday, 19 March 2017

Sunday Stitch School - Revision: Stitches 11 - 15

Before we move on to a new stitch, let's revise the five most recent stitches, Knotted Satin, Lace, Mountmellick, Norwich and Open Chain Stitch.

Here is a summery. Click on the headline to learn the stitch and read more.

Knotted Satin Stitch
It didn't take long to learn this stitch, but it was a struggle to get it right. These Satin Stitches need to be crowded, and the shorter the leg, the nicer they behave.


Lace Stitch
This row of triangular stitches was a pleasure to work, meditative and easy, and gave a very pleasing result. I like both the pulled-tight version that opens holes in the fabric 

and the version where the thread stands out.


Mountmellick Stitch
The main stitch in the Irish Mountmellick embroidery style is a favorite from the past and was nice to use once again, here in colour and on thin red fabric.


Norwich Stitch
This is a Canvas stitch and I learned the hard way that such stitches really should be worked on CANVAS and not on any limp fabric. I also learned that if you mark plain fabric and choose your thread well you can get stunning result.


Open Chain Stitch
This version of Chain stitch was easy and enjoyable to play with, and I am very grateful to CrazyQstitcher for suggesting tying the rungs of the ladder together into bunches.


Homework:
Put SSS stitches 11 - 15 to good use on yet another Sunbonnet Sue design.
Now do you remember the name of this stitch? What kind of design of Sunbonnet Sue is it, do you think?

Friday, 17 March 2017

Friday Homework for Lesson 15: Open Chain Stitch

Oh, it's Friday and time to hand in the homework assignment for Lesson 15, which is the Open Chain Stitch.

For this stitch my conclusion is that you have to check the tension so the stitches sit nicely. Open Chain Stitch can also be used in a more folksy, rough form, as seen here:
I made three parallell lines of yellow and formed a cross. Each side was then flanked with filling stitches in a blue space dyed perle until I had a round shape. This I circled the edges of with metallic cord which I couched down with Open Chain stitch.

I can't say I like the design but it was fun to make.

The other day I got a suggestion from CrazyQstitcher. She had found a neat version of Open Chain Stitch in A Handbook for Lettering for Stithers by Elsie Svennas.

Each three rungs of the 'ladder' of the Open Chain Stitch are bundled together, similar to the way you create a Sheaf Stitch.


With a piece of white card inside I made both these samples of Open Chain Stitch into small greeting cards. This is how I mount my cards.

I will add a small brooch in the centre of this one.


Wednesday, 15 March 2017

WIPW - Ten More Tails

Work In Progress Wednesday.
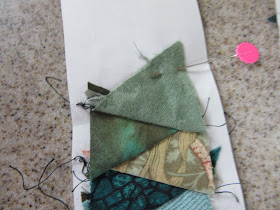
Trinity Green

My 'snakes' are growing tails!

Those of you who have been following this project
(started at the end of April 2016)
know that I am making a large quilt
(bed spread size)


out of small
(2.5 cm tall and 2 cm wide at the base) triangles.


You know that they are green 
(all shades)

and come from many sources
(my stash, my friends' stash, old clothes, tea towels, upholstery and whatnots).

You know that I am stitching these triangles onto paper strips 
 (27 triangles each)


where the triangles are darker on one side and lighter on the other.


You know that I have joined these paper strips into long 'snakes'
(8 paper strips in each 'snake')


and that I have 38 'snakes' hibernating in my vivariums.


What you don't know is that they have begun to grow tails!

I find that I want a good over hang for this bed spread and need to add a tail of 27 triangels to each snake. That way the quilt will be long and nice.

Last week I added 10 tails,
and this week I added another 10.
So the total count is now 8.748 triangles.

I have another 18 tails to make and then I can forget about triangles, and stitch the snakes side by side to thin strips of plain green fabric and finally have my flimsy.


Fabric in Focus

So simple, so rich - green and gold


Sunday, 12 March 2017

Sunday Stitch School - Lesson 15: Open Chain Stitch

It's Sunday and time to stitch!

Sunday Stitch School this week presents an easy and enjoyable stitch - the Open Chain Stitch. Anyone who is familiar with the Chain Stitch, will soon adjust its width and have an Open Chain Stitch.

Other names for the stitch are:
Square Chain Stitch
Roman Chain Stitch
Ladder Stitch
Small Writing Stitch (if narrow)
Big Writing Stitch (if wide)
and
Bred Kedjesöm is the Swedish term
Annet tells me in Dutch it has two names:
Vierkante or
Brede Kettingsteek
Mattia has supplied this list of names in French
point de chaînette échelle
point de chaînette carré
point noeudé dans la Broderie Bretonne

Work it like this:


 On my Aida sampler:


Homework:
Couch down the metallic cord with Open Chain Stitch, and
use it as a filling stitch for something on this piece of red fabric.