Pages

Wednesday, 29 October 2014

WIPW - Completed x 3

Work In Progress Wednesday is a way to help you finish your needlework projects. Read about it here at Pintangle.
WIPW really works; I don't know if any of my progress this week would have happened if it hadn't been for the weekly routine, and the supportive and kind comments and suggestions by WIPW participants.

Kafferepet
Completed #1.
The quilting is done!
I have also bought some fabric for the next stage, the edge.

Swedish Cushion
The Swedish cushion has been sleeping all week, and is patiently waiting for a new TAST stitch to fill in some stray empty spaces. (A hint to Sharon, I am hoping for a triangular stitch... ; ) )

New WIPW - TASTy Beads Galore
As there are no beaded TAST stitches on the Swedish cushion, I have started on a new project where I want to add the TAST stitches with beads.
The first stitch is TAST #135 Beaded Fern Stitch.

Swedish Wool Embroidery Collar
Completed #2.
Here is the completed collar shown with the two wrist warmers I made last year.
We are ready for the cold!

Extra WIPW - Felted Bluebells
Completed #3.
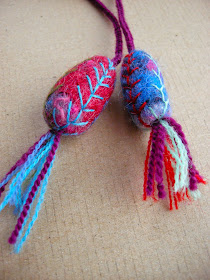
Do you remember the felted bluebells I had intended to use as ornaments on the strings of the collar? As they were too large, I dressed them up with some embroidery and beads, and turned them into Christmas decorations. Who's heard of Winter Bluebells?

TAST Reference Chart
#135 Beaded Fern Stitch has been added.
I hope you are working towards completing a project, too. Keep up the good work!

Sunday, 26 October 2014

TAST #135 Beaded Fern Stitch

Trust Sharon B of Pintangle to turn the basic Fern Stitch into a beaded version.
Here is TAST stitch #135 Beaded Fern Stitch:
 It looks as good on Aida, above, as on the sampler, below, don't you think?
 Want to learn it for yourself? Head over to Pintangle and join in the fun.


Wednesday, 22 October 2014

WIPW - Next week Wednesday


Work In Progress Wednesday helps you work towards completing needlework projects. Read and learn from Pintangle, then join in, if you want to share the fun.

Kafferepet
I have added another row of quilting.

Swedish Cushion
The recently learned Fern stitch, TAST #134, quickly found its way onto the cushion. Pink Perle #8.

TAST Reference Chart
The Fern stitch grew here, too, and in a circle!
I need to remove the blue marker lines!

Swedish Wool Embroidery Collar
Last week I showed a photo of wool fleece. I took it while attending a workshop in felting on the island of Koster near the Swedish West Coast in July.
There I made two 'bluebells' to use as ornaments for the cords of the collar.
I was very pleased with them until I saw that they were too large.
New ornaments had to be made. I had some wool in my stash in Tokyo, and remembered the technique. The result was two smaller ornaments, however they are not bluebells.
Instead their plainness make them perfect for TAST embroidery, and as you can see the Fern Stitch came out to play again.
A few stitches here and there and the Swedish Wool Embroidery Collar will be complete. It will be on display next Wednesday!

Where do you think the two bluebells are destined for? The bin? The cupboard? Or the ...? Also on display next Wednesday. Until then have a happy stitchy time!

Sunday, 19 October 2014

TAST #134 Fern Stitch


Do you want to learn a lot about stitches? Join TAST! It stands for Take A Stitch Tuesday and the course leader, Sharon Boggon, introduces us to a new stitch every Tuesday on her website Pintangle. We then try the stitch and write a blog post about it, leave a link to our own blog on Sharon's website (comment box of Pintangle) so that others can share. Everyone has something to contribute and we learn so much from each other. It is also great fun! This week it was time for stitch number 134, the Fern Stitch.

Although I have often seen this stitch and know how useful it is for making stems, branches and twigs, I have actually never learned it. It comprises of three simple straight stitches, and you would think that working them in any way would be OK. Do we really need to learn this?

I had some time on my hands one day and sat pondering about my needlework teacher in primary school. She had fixed rules and beliefs, one of them was 'although the result should be as neat and perfect as you can make it, it is the process that is important; you must learn to do the stitch the right way'. The question I was now contemplating was, is there a right way to do a stitch. The instructions vary from stitch guide to stitch guide. Just for the fun of it I took out my collection of books to see how many ways there were for the Fern Stitch.
A purple             B yellow left          C yellow right         D green left            E green right

I found these five ways. 
A is from a Japanese book. B is worked as a cluster of three lines and would be a good detached Fern Stitch. C is Ms Totsuka's method (see note of Kiko's Flower). D and E are a left-hand and right-hand variation of the same instructions. 
From the front they look quite similar. It is when you see them from the back that you notice the difference. (I have started and ended the stitches with a knot to have as little obstacle as possible for the photo.)


We can see that each method uses different amounts of thread and if sewn on a sheer fabric you would sometimes see the thread on the back showing through.
Here the fabric was held up against a window and you can clearly see the shadows some of the stitches make.
As I was working I soon found which instructions suited me - my way of holding the needle, the angle and direction of the movement and which stitch gave me the most 'flow'.

I came to the conclusion that my needlework mistress in school was wrong about there being a universal 'right' way of stitching. There is, however, a right way for each of us!
Now what do you think?

Time to stitch the samplers.
On the Aida practising cloth:
On the sampler
A question for you, which of the five methods did I find to be the right one for me?

A purple      B yellow left       C yellow right      D green left      E green right

Wednesday, 15 October 2014

WIPW - Almost done

Work In Progress Wednesday, if you don't know it already,  is a GREAT thing. Read about it at Pintangle.

Kafferepet
The fourth row of quilting has been added.
 Not too much left, almost done.


Swedish Cushion
I just love TAST #133 Triple Chain and found a great place for it on the cushion.
(Its mirror image line will be used for this week's stitch #134 Fern Stitch. Check this space next week!)

TAST Reference Chart
As I said, I love TAST #133 Triple Chain and after adding a plain straight line of stitches to the left, I worked a circle. With a bit more planning the stitches would look neater, still, here you can see the potential for a beautiful wreath.

Swedish Wool Embroidery Collar
Cord making has taken up a lot of my time this past week.
First I made a simple lucet cord with one of the woolen yarns also used in the embroidery and napped edging. It was easy and quick. The result is a soft, simple, flexible cord, albeit it looks a bit plain.

Then I got started on the kumihimo cord. I tried several times until I found my way. With 16 strands of woolen yarn I ended up with a thick rope! Too thick!
If I used only 8 strands I had to turn the disc so much (45˚) for each move, my head started spinning. Too dizzy!
As the only very thin woolen yarn I had was black, yellow and blue, I needed to add perle #8 for some other colours, and perle is cotton which does not have much flexibility. Too stiff!
Anyway, the result of my work is these two cords.
The kumihimo is MUCH more beautiful, but FAR too sturdy.

So in the end my choice was the lucet cord.
Another reason for picking this cord was that, being plain it does not steal the show from the embroidery on the collar itself.
Almost done!

Next step will involve this:


Now if you think I just tossed the kumihimo cord into the bin or stuffed it into a drawer, please think again. It quickly found a job and a home.
Profession: Official Reading Glasses String
Address: Queenie's Reading Specs
Completely done!

Monday, 13 October 2014

TAST #133 Triple Chain Stitch

What a delightful stitch TAST (Take A Stitch Tuesday) #133 is. Called Triple Chain it is of course made up of three Chain stitches. It makes such a beautiful braid like line and it is easy to stitch, too!
Learn it on Pintangle.


Wednesday, 8 October 2014

WIPW - Kiko's Flower Blooms Again

Work In Progress Wednesday, WIPW, is the right thing to join if you want to get help finishing your needlework projects. Got to Pintangle to read more.

Kafferepet
I'm now on the third row of Chain stitch quilting.


Swedish Cushion 
Kiko's Flower stitch, TAST #132, found its flower bed in one of the paisley designs.


Swedish Wool Embroidery Collar
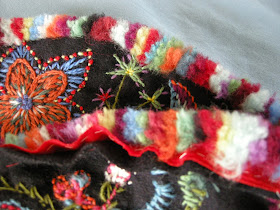
The lining is on, and as you can see I used the same fabric that I lined the wrist warmers with last year. It actually comes from a kimono my sister-in-law used in her youth. Unfortunately it had been stored without mothballs and the hungry buggers had munched their way right through all the layers (kimonos are stored folded) perforating many areas of the garment. Now the scraps of the kimono have found a new life on my Swedish Collar.


The next step is making cords so the collar can be tied with a bow. I have a choice of two methods; either following the kimono lining theme and making a Japanese kumihimo braid with either of the white discs, or sticking to the Swedish theme and using the Slynggaffel, called lucet in English. This fork like tool has been used since Viking age, although this one is made of plastic and was bought at FOQ last year.
This is my first attempt. The lucet cord becomes square, and works up really fast. Since working this orange knobbly cotton yarn, I tried some purple wool. I find lucetting quite addictive and the result is a strong, but smooth cord...

This is just an old scrap; I have made lots of kumihimo cord in the past and do not need to test the technique. A great advantage is that the kumihimo cord can be worked in several colours. Slow work, though...

Which type of cord would you choose for the collar?

TAST Reference Chart
Kiko's Flower grows like weed! Here it is again on the TAST Reference Chart.
I believe this is the neatest of all the flowers I have stitched - at last one I feel I have been in control of!

Monday, 6 October 2014

TAST #132 Kiko's Flower

Sharon Boggon is always giving us such a great variety of stitches to learn in her Take A Stitch Tuesday online stitch course. This week is no exception, TAST #132 Kiko's Flower is a beautiful stitch. Go to Pintangle and learn.
Sharon says she got to know this stitch through a Japanese lady (called Kiko, I presume), who had no official name for the stitch. After doing a bit of research I found it in Sadako Totsukas's  Totsuka Embroidery Stitch Book 8, Lazy Daisy stitch variation #56, a Japanese stitch dictionary.

As always Sharon's example is beautifully made, but I found it at bit tricky to get that neat look.
First on Aida, I made some petals, a flower and a butterfly.
Especially the Bullion knots look uneven and 'wormy'. Hmm...

On my sampler I had another problem.
You can see on the three petals (top right) how the last loop of the Lazy Daisy chain is creeping up over the Bullion knot.
After consulting the directions in Ms Totsuka's book I saw that the Lazy Daisy stitches should be anchored in each top corner after the Bullion has been laid down:

The two blue flowers look better than the red and pink petals. So, one problem solved. Now for the wormy Bullions.

Look at the two blue flowers again, and see how the Bullion stitches look different.
The light blue flower on the left has straight wraps, but on the flower on the right the wraps appear to be slanting.
I dug out all my embroidery books (about 12) and found that in half of them the instructions is for wrapping the thread anti-clockwise around the needle, the other half favour a clockwise wrap.

Personally I like the look of the blue 'worm' with its slanting wraps. 
Stitch oracle Mary Corbet has written in great detail on this subject here.

How do you make your Bullion stitches?

Wednesday, 1 October 2014

WIPW - idle fingers

Work In Progress Wednesday is a good chance to show off what progress one has made on one's needlework, or how little progress one has made! My fingers have been idle this week, and I do not have much to show. Head over to Pintangle and see what more nimble fingers have produced.

Swedish Cushion
NO progress whatsoever.


Swedish Wool Embroidery Collar
I stitched the kavelfrans (napped edgings) to the edge of the collar. It was HARD work to tame the 'fluffy creature' who wanted to wriggle, twist and turn, but now that it is 'chained',  I can put on the lining.

Kafferepet
I have quilted another row of (uneven) Chain Stitches along the border.


TAST Reference Chart
I added TAST #131 Beaded Lock Stitch to my reference chart.