Part 1 - Getting Started and Making the Head
It has been my long-time intention to make a tutorial, and finally, I have completed a series of how-tos for stumpwork portraits. They are inspired by Fay Maxwell, whose excellent book Ladies with Hatitude I warmly recommend.
The Tutorial can be found under the tag Stumpwork Portrait Tutorial at the top of the blog.
The first part is here. Let's get started.
First of all, I collect the following
MATERIAL
- Embroidery hoop
- Fabric for the background, enough to fit into the hoop
- Fabric for the face and neck
- A ball of wadding for stuffing
- Fabric scraps and ribbons for clothes
- Beads and buttons for decoration
- Sewing thread to match the skintone of the face
- Stranded floss for the outline of the eyes, eyelashes and eyebrows
- Stranded floss for the iris
- Black sewing thread
- White sewing thread
- Stranded floss, yarn, sari silk... any fiber for the hair
- Needles
- Pins
- Scissors
HEAD and NECK

Cut out a round or oval shape, stitch a line of Running Stitch along the edge.

Place a ball of wadding in the middle and pull the thread

Gather the fabric round the ball of wadding and stitch it shut.
Don't worry if it looks uneven.
Stretch some background fabric in the hoop.
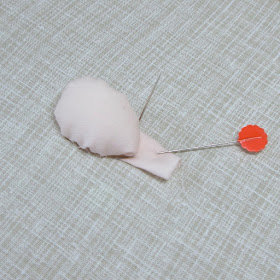
Fold the piece for the neck to a width that is in proportion to the head. Fix it to the background fabric with a pin.
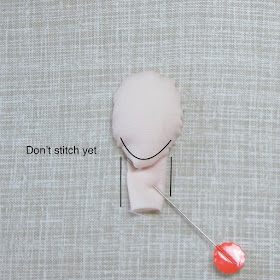
Place the head on top of the neck.
Stitch the sides and top of the head to the background. Even out any puckers.
Next up, Part 2 - NOSE
which will be published in a couple of days' time.


Very clear. This will, I am sure, be very useful to many of your readers!
ReplyDeleteI hope so!
DeleteI've got my head and neck sewn!!! I'm excited!
ReplyDeleteThat was quick! You can put a nose on the face on Saturday!
DeleteI have done stumpwork ages ago and this is a great reminder of how to start should I get the urge to make another.
ReplyDeleteFay Maxwell's method is 'free' and fun, no need to do the fiddly padding, layering and air-stitching way of traditional stumpwork.
DeleteI'll look to try this on the weekend. Thanks!
ReplyDeleteThere are six parts in the series and I will post three times a week so you will have all sections in two weeks' time. I hope you will enjoy it!
DeleteOther than color, is there any preference of fabric to start with?
ReplyDeleteWell, the background fabric needs to be in a hoop, especially for when you make the eyes, so a fabric that can be stretched tight in the hoop is best. I would choose a plain weave, quilters cotton, sheeting or similar.
DeleteAs for the skin tone, ANY colour is fine as nature has given us all different shades. If your portrait is a seasick person or a Martian, why not use green!
Have fun!
Thank you for the link to Fay Maxwell. I know of her ..... the ladies at my handicraft group made a wall hanging a few years with guidance from her “Crewel and Unusual” book.
ReplyDeleteI just need to find some backing fabric, then I’m ready to start! Off to search my stash!
Hugs,
Barbara xx
I have that book, too!
DeleteI once had a workshop with Fay, and have spoken to her several times at the Festival Of Quilts. I even have one of her original Stumpwork portraits. Her work is beautiful and very original.
I've enjoyed seeing your stumpwork heads over the years and today's post is a timely reminder that I should finish some I began 10?years ago. I'll be following your lessons.
ReplyDeleteThanks for sharing.
More pressure?!
DeleteI hope you enjoy taking up that stumpwork project again. There are so many ways to do 3D embroidery, and this free form of stumpwork is like crazy quilting - anything goes!
Oh that you so much for the great tutorial, my friend. I LOVE it!!!!!!! Kisses!!!!!!!!
ReplyDelete