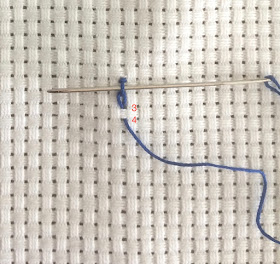
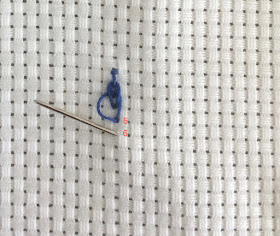
Start by making a short straight stitch. 1-2
Take the needle out a bit further down. 3
Then let the needle pass underneath that straight stitch, without going through the fabric.

Insert the needle at 3
and come out a bit further down at 4
Once again, let the needle pass underneath the same straight stitch, without going through the fabric.
Insert at 4.
Out at 5.
You now have a double Chain Stitch.
Next, let the needle pass underneath the upper chain of that double Chain Stitch, without going through the fabric.
Insert at 5.
Out at 6.
You now have another double Chain Stitch.
Repeat in the same way 6-7, and always let the needle go underneath TWO Chain Stitches.
Does it look complicated? With a bit a practice, it will become easier.
It creates a beautiful braided line and looks good on curves so it would be perfect for monograms or text.
For stump work, it would make a beautiful knitted sweater if worked in a row of columns.
There are two names in Swedish: 1) Täta Maskstygn, eller 2) Kedjesöm under en länk. Is there a name in your language for this stitch?
Yes, according to Mattia (thank you) it is : point de chainette serré ou pt de chainette cordé
Homework:
Scribble something with red variegated Perle on this slip of batik and make it into a greeting card.


this gives a very firm finish and yes can picture clearly on stump work
ReplyDeleteAs the stitches are double they get raised from the fabric and become very touchable.
DeleteVery nice! I like the look of this stitch.
ReplyDeleteIt's nice to work it, too. Give it a try when your arm has healed.
DeleteGet better soon!
Great! this stitch is in my to do list for quite some time.
ReplyDeleteI hope you find the time to play with it. I am looking forward to how you are going to 'tweak' it!
DeleteI found this stitch in 2 old books this week.
ReplyDeleteIt was the first time for me to use this stitch which I have seen many times in books, but never tried until now. I LOVE it!
DeleteI know the stitch but have never thought of writing with it. Will have to give that a try.
ReplyDeleteI think it is an excellent stitch for writing as it takes curves well and leaves an embossed look.
DeleteOh, I LIKE this stitch. I'm going to try it soon.
ReplyDeleteThanks for Stitch School.
xx, Carol
That does make a beautiful full braid, Queenie.
ReplyDeleteThis looks a very useful stitch. I like to write with embroidery.... another one for my "to do" list!
ReplyDeleteLooking forward to seeing your greeting card.
Barbara x